This code demonstrates working with Lists and ArrayLists in Android Kotlin.
Lists
- Lists are immutable (read-only) collections of elements.
- They can be created using the
listOf()function. - Once created, elements cannot be added, removed, or modified.
- Lists can hold elements of various data types.
Mutable Lists
- To create a mutable list (read-write), use
mutableListOf(). - Elements can be added, removed, or modified after creation.
ArrayLists
- ArrayLists are similar to Lists but are mutable (read-write).
- They are created using
arrayListOf()orArrayList(). - Elements can be added, removed, or modified after creation.
- Common operations include:
- Add elements using
add() - Remove elements by index using
removeAt() - Remove elements by value using
remove()
- Add elements using
The code includes an example of working with both Lists and ArrayLists:
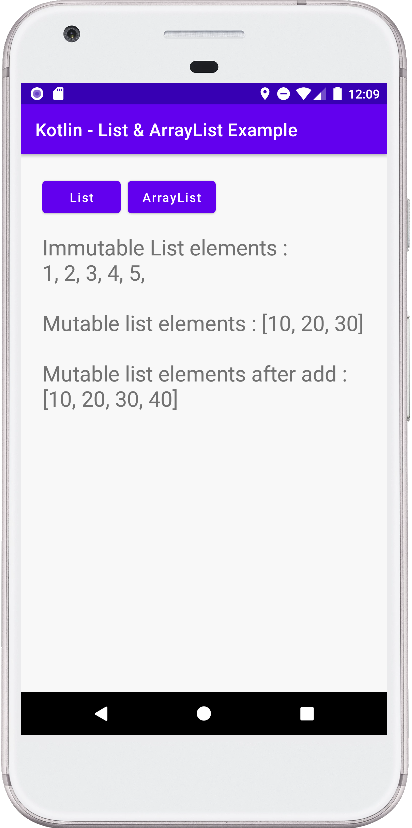
- The button with the text "List" creates a list of integers, a list of various data types, an integer list, a string list, a float list, and a double list. It then displays the elements of each list in the text view.
- The button with the text "ArrayList" creates an integer ArrayList, a string ArrayList, and an integer ArrayList. It then adds elements to the ArrayLists, removes elements from the ArrayLists, and displays the elements of the ArrayLists in the text view.
Summary
This script provides a basic overview of Lists and ArrayLists in Android Kotlin. It showcases creating Lists and ArrayLists of different data types, as well as performing common operations on them.
Here is a table summarizing the key differences between Lists and ArrayLists:
| Feature | List | ArrayList |
|---|---|---|
| Mutability | Immutable (read-only) | Mutable (read-write) |
| Creation method | listOf() | arrayListOf() or ArrayList() |
| Adding elements | Not allowed | add() |
| Removing elements | Not allowed | removeAt() or remove() |
| Modifying elements | Not allowed | Allowed |
MainActivity.kt
package com.cfsuman.kotlintutorials

import android.os.Bundle
import android.text.method.ScrollingMovementMethod
import android.widget.Button
import android.widget.TextView
import androidx.appcompat.app.AppCompatActivity


class MainActivity : AppCompatActivity() {
    override fun onCreate(savedInstanceState: Bundle?) {
        super.onCreate(savedInstanceState)
        setContentView(R.layout.activity_main)

        // get the widgets reference from XML layout
        val textView = findViewById<TextView>(R.id.textView)
        val btnList = findViewById<Button>(R.id.btnList)
        val btnArrayList = findViewById<Button>(R.id.btnArrayList)


        // make textview content scrollable
        textView.movementMethod = ScrollingMovementMethod()


        // list example
        btnList.setOnClickListener {
            // Initialize a new list
            // Immutable list, read only
            val list = listOf(1,2,3,4,5)

            // Initialize a list which hold various
            // data type elements
            var anyList = listOf(1,1.5F,2.0,"Pink")


            // Initialize an integer data type list
            var intList = listOf<Int>(1,2,3,4,5)

            // Initialize an string data type list
            var stringList = listOf<String>(
                "Rose","Pink","Red","Orange")

            // Initialize an float data type list
            var floatList = listOf<Float>(1.0F,2.5F,3.3F)

            // Initialize an double data type list
            var doubleList = listOf<Double>(1.1,1.6,2.9,3.5)

            // Display list element in text view
            textView.text = "Immutable List elements : "
            // Loop through the list elements
            for(element in list){
                textView.text = textView.text.toString() +
                        element + ", "
            }

            // Initialize a new mutable list
            // Read and write both allowed
            var mutableList = mutableListOf<Int>(10,20,30)

            // Display the mutable list element
            textView.text = textView.text.toString() +
                    "\n\nMutable list elements : $mutableList"

            // Add an element to list
            mutableList.add(40)

            // Display the mutable list element
            textView.text = textView.text.toString() +
                    "\n\nMutable list elements after add " +
                    ": $mutableList"
        }


        // array list example
        btnArrayList.setOnClickListener {
            // Initialize an integer array list
            // using arrayListOf() method
            val intArrayList = arrayListOf<Int>()
            intArrayList.add(100)


            // Initialize a string array list
            // using arrayListOf() method
            val stringArrayList = arrayListOf<String>()
            stringArrayList.add("Yellow")


            // Initialize a new integer data type array list
            // Mutable list, read and write
            val arrayList = ArrayList<Int>()

            // Add elements to the list
            arrayList.add(5)
            arrayList.add(15)
            arrayList.add(25)
            arrayList.add(35)

            // Add element to the list at the
            // specified index position
            arrayList.add(0,10)

            // Now list elements
            textView.text = "ArrayList elements : $arrayList"

            // Remove list element by index
            arrayList.removeAt(1)

            // Remove list element by value
            arrayList.remove(35)


            // Now list elements
            textView.text = textView.text.toString() +
                    "\n\nArrayList elements," +
                    " after remove : $arrayList"
        }
    }
}
activity_main.xml
<?xml version="1.0" encoding="utf-8"?>
<androidx.constraintlayout.widget.ConstraintLayout
    xmlns:android="http://schemas.android.com/apk/res/android"
    xmlns:app="http://schemas.android.com/apk/res-auto"
    xmlns:tools="http://schemas.android.com/tools"
    android:layout_width="match_parent"
    android:layout_height="match_parent"
    android:background="#F8F8F8"
    android:padding="24dp">

    <Button
        android:id="@+id/btnList"
        android:layout_width="wrap_content"
        android:layout_height="wrap_content"
        android:text="List"
        android:textAllCaps="false"
        app:layout_constraintStart_toStartOf="parent"
        app:layout_constraintTop_toTopOf="parent" />

    <Button
        android:id="@+id/btnArrayList"
        android:layout_width="wrap_content"
        android:layout_height="wrap_content"
        android:layout_marginStart="8dp"
        android:text="ArrayList"
        android:textAllCaps="false"
        app:layout_constraintBottom_toBottomOf="@+id/btnList"
        app:layout_constraintStart_toEndOf="@+id/btnList" />

    <TextView
        android:id="@+id/textView"
        android:layout_width="0dp"
        android:layout_height="0dp"
        android:layout_marginTop="16dp"
        android:fontFamily="sans-serif"
        android:textSize="24sp"
        app:layout_constraintBottom_toBottomOf="parent"
        app:layout_constraintEnd_toEndOf="parent"
        app:layout_constraintStart_toStartOf="parent"
        app:layout_constraintTop_toBottomOf="@+id/btnList" />

</androidx.constraintlayout.widget.ConstraintLayout>