Introduction
In Android development, networking is a key aspect of building apps that communicate with external services, and Ktor—a Kotlin-based HTTP client—is a popular choice for handling network requests in modern apps. Combined with Jetpack Compose, Android's declarative UI toolkit, we can achieve clean, readable, and maintainable code. This example demonstrates how to pass parameters to an API call using Ktor in an Android Jetpack Compose project. We'll break down the components of the project, focusing on network requests, parameter passing, and the integration of Compose for displaying API responses.
This guide will take you through the steps of creating a simple Android app that makes a network request using Ktor and displays the response. You will see how Ktor's features like JSON serialization, logging, and timeouts are configured, and how parameters are passed in the network request. By the end, you'll understand how to make asynchronous network calls in a Compose UI and handle API responses efficiently.
Breakdown of the Code: KtorClient Configuration
The KtorClient.kt file defines the KtorClient object, which is responsible for configuring the Ktor HTTP client. This client is set up with a few key features that enhance the functionality of HTTP requests.
First, the client configures JSON serialization using the JsonFeature with KotlinxSerializer. This serializer allows easy handling of JSON responses. The configuration of the Json object ensures that default values are encoded, and unknown keys in JSON responses are ignored, making the API responses more robust when dealing with unexpected fields.
Logging is another important feature in this configuration. The Logging feature allows you to log network requests and responses. In this example, a custom logger is defined using Android's Log.d to print messages with the tag "xapp-ktor". The log level is set to LogLevel.ALL, so all details about the HTTP requests and responses are logged.
Timeouts are also configured using HttpTimeout, where the socket, request, and connection timeouts are all set to 15 seconds. This prevents long-hanging requests from stalling the app, ensuring a responsive user experience.
Finally, the defaultRequest block sets the default content type and accepted response type as application/json. This ensures that every request made with this client will send and expect JSON data by default.
Making API Calls in APICaller
The APICaller.kt file contains the getFoo function, which is responsible for making the network request. This function is marked as suspend, indicating that it performs asynchronous work and needs to be called from a coroutine.
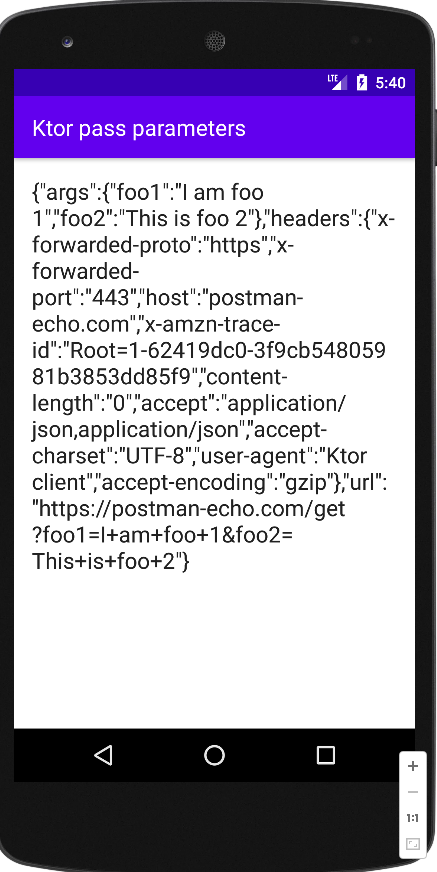
The function uses the KtorClient.httpClient to make a GET request to an example API endpoint ("https://postman-echo.com/get"). In this request, two parameters are passed—foo1 and foo2—using the parameter method. These parameters are sent along with the request, allowing dynamic data to be included in the API call.
The request is made using the use block, which ensures that the HTTP client is properly closed after the request is complete. This is important for resource management, preventing memory leaks and ensuring that network connections are cleaned up properly.
MainActivity and Jetpack Compose UI
The MainActivity.kt file defines the main entry point of the Android app, where the UI is built using Jetpack Compose. The app is structured using a Scaffold layout, which provides a basic structure with a TopAppBar and content area.
The main content of the screen is handled by the MainContent composable function. Inside this function, the produceState function is used to manage the state of the network request. The getFoo function is called asynchronously in the background, and its result is stored in the args variable.
Once the network request completes, the returned value (a string) is displayed using a Text composable. The Modifier.fillMaxSize() ensures that the content fills the available screen space, while Modifier.padding(16.dp) adds some spacing around the content.
This simple UI allows the user to see the result of the API request once it completes, with the response text shown in a material-style heading (MaterialTheme.typography.h6).
Gradle Configuration
The build configuration for this project is spread across two files: build.gradle for the project and build.gradle for the app module. In the project-level build.gradle, the Kotlin serialization plugin is added, which enables support for Kotlin's serialization library.
In the app-level build.gradle, several dependencies are added:
ktor-client-androidfor using Ktor in Android.ktor-client-serializationfor JSON serialization.kotlinx-serialization-jsonfor handling JSON objects.ktor-client-logging-jvmfor logging HTTP requests and responses.
These dependencies are essential for making network requests, handling JSON data, and logging requests in this project.
Summary
This example illustrates how to integrate Ktor with Jetpack Compose in an Android app for making network requests with parameters. The configuration of the Ktor client ensures that JSON data is handled efficiently, requests are logged for debugging purposes, and timeouts are managed properly to avoid long-running operations. The getFoo function demonstrates how to pass parameters in a GET request, and the UI is built using Compose to display the response.
With this setup, you can easily expand the app to handle more complex API interactions, pass different sets of parameters, and display dynamic content based on network responses. This example serves as a strong foundation for building modern Android apps that rely on networking with Ktor and Jetpack Compose.
package com.cfsuman.composenetwork

import android.util.Log
import io.ktor.client.*
import io.ktor.client.features.*
import io.ktor.client.features.json.*
import io.ktor.client.features.json.serializer.*
import io.ktor.client.features.logging.*
import io.ktor.client.request.*
import io.ktor.http.*
import kotlinx.serialization.json.Json

object KtorClient{
    private val json = Json {
        encodeDefaults = true
        ignoreUnknownKeys = true
    }

    val httpClient = HttpClient {
        install(JsonFeature){
            serializer = KotlinxSerializer(json)
        }

        install(Logging){
            logger = object : Logger {
                override fun log(message: String) {
                    Log.d("xapp-ktor", message )
                }
            }
            level = LogLevel.ALL
        }

        install(HttpTimeout){
            socketTimeoutMillis = 15_000
            requestTimeoutMillis = 15_000
            connectTimeoutMillis = 15_000
        }

        defaultRequest {
            contentType(ContentType.Application.Json)
            accept(ContentType.Application.Json)
        }
    }
}
package com.cfsuman.composenetwork

import io.ktor.client.request.*
import io.ktor.utils.io.core.*

suspend fun getFoo(): String{
    return KtorClient.httpClient.use {
        it.get("https://postman-echo.com/get"){
            parameter("foo1","I am foo 1")
            parameter("foo2","This is foo 2")
        }
    }
}
package com.cfsuman.composenetwork

import android.os.Bundle
import androidx.activity.ComponentActivity
import androidx.activity.compose.setContent
import androidx.compose.foundation.layout.*
import androidx.compose.material.*
import androidx.compose.runtime.*
import androidx.compose.ui.Modifier
import androidx.compose.ui.unit.dp
import com.cfsuman.composenetwork.ui.theme.ComposeNetworkTheme


class MainActivity : ComponentActivity() {
    override fun onCreate(savedInstanceState: Bundle?) {
        super.onCreate(savedInstanceState)
        setContent {
            ComposeNetworkTheme {
                Scaffold(
                    topBar = {
                        TopAppBar(
                            title = {
                                Text(text = "Ktor pass parameters")
                            }
                        )
                    },
                    content = { MainContent()}
                )
            }
        }
    }
}


@Composable
fun MainContent() {
    val args = produceState(
        initialValue = "",
        producer = {
            value = getFoo()
        }
    )

    Column(Modifier.fillMaxSize().padding(16.dp)) {
        Text(
            text = args.value,
            style = MaterialTheme.typography.h6
        )
    }
}
buildscript {
    dependencies {
        classpath "org.jetbrains.kotlin:kotlin-serialization:1.6.10"
    }
}
plugins {
    id 'kotlinx-serialization'
}


dependencies {
    implementation 'io.ktor:ktor-client-android:1.6.8'
    implementation 'io.ktor:ktor-client-serialization:1.6.8'
    implementation 'org.jetbrains.kotlinx:kotlinx-serialization-json:1.3.0'
    implementation 'io.ktor:ktor-client-logging-jvm:1.6.8'
}
- jetpack compose - Get text from url
- jetpack compose ktor - How to post data
- jetpack compose - Kotlinx serialization pretty print
- jetpack compose - Kotlinx serialization lenient parsing
- jetpack compose - Kotlinx serialization alternative json names
- jetpack compose - Kotlinx serialization build json array
- jetpack compose - Flow current time
- jetpack compose - How to flow a list
- jetpack compose - How to use ViewModel state
- jetpack compose - Flow using ViewModel
- jetpack compose - Search Room data using ViewModel