Compose Image From Vector Resource
The Image is a widget of the android jetpack compose library that allows us to display an image instance to our android mobile device user interface. Image widget can display an image from various sources such as bitmap resources, painter resources, and even vector resources.
This android application development tutorial will instruct us on how we can show an image object on an Image widget surface from a vector resource. To start this tutorial first, we have to put a vector resource into our application’s specified directory. In this tutorial, we get a vector resource by right-clicking the ‘drawable’ folder then navigating to ‘new’, and then selecting ‘Vector Asset’. From here we select a vector image to put it into our ‘drawable’ folder. So we now get our vector resource to use inside the Image widget.
To show an image from the vector resource we will use the Image widget special constructor which supports the ‘imageVector’ parameter. To specify the ‘imageVector’ parameter value we will use the ‘ImageVector.vectorResource()’ method where we will pass the drawable id as the ‘id’ parameter value. Finally, the Image widget will display the specified vector image to its surface.
An android jetpack compose developer can change the vector image size using the Image modifier element. They can align the source image. Even they can color filter/tint the source vector image. This kotlin tutorial code is written in android studio IDE, so copy the code and paste it into your compose application, run the emulator device and see the result. Here we also provide a screenshot of this tutorial output.
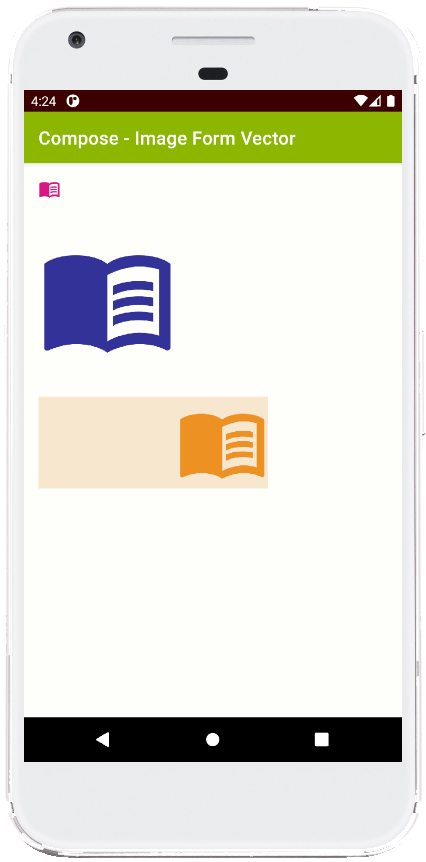
MainActivity.kt
package com.cfsuman.jetpackcompose

import androidx.appcompat.app.AppCompatActivity
import android.os.Bundle
import androidx.activity.compose.setContent
import androidx.compose.foundation.Image
import androidx.compose.foundation.background
import androidx.compose.foundation.layout.*
import androidx.compose.runtime.Composable
import androidx.compose.ui.Alignment
import androidx.compose.ui.Modifier
import androidx.compose.ui.graphics.Color
import androidx.compose.ui.graphics.ColorFilter
import androidx.compose.ui.graphics.vector.ImageVector
import androidx.compose.ui.res.vectorResource
import androidx.compose.ui.tooling.preview.Preview
import androidx.compose.ui.unit.dp

class MainActivity : AppCompatActivity() {
    override fun onCreate(savedInstanceState: Bundle?) {
        super.onCreate(savedInstanceState)

        setContent {
            MainContent()
        }
    }


    @Composable
    fun MainContent(){
        Column(
            modifier = Modifier
                .fillMaxSize()
                .background(Color(0xFFFEFEFA))
                .padding(16.dp),
            verticalArrangement = Arrangement.spacedBy(32.dp)
        ) {
            Image(
                ImageVector.vectorResource(
                    id = R.drawable.ic_baseline_menu_book_24
                ),
                "Localized description",
                colorFilter = ColorFilter.tint(Color(0xFFDA1884))
            )

            Image(
                ImageVector.vectorResource(
                    id = R.drawable.ic_baseline_menu_book_24
                ),
                "Localized description",
                colorFilter = ColorFilter.tint(Color(0xFF333399)),
                modifier = Modifier
                    .size(150.dp)
            )

            Image(
                ImageVector.vectorResource(
                    id = R.drawable.ic_baseline_menu_book_24
                ),
                "Localized description",
                colorFilter = ColorFilter.tint(Color(0xFFED9121)),
                modifier = Modifier
                    .size(250.dp,100.dp)
                    .background(Color(0xFFF7E7CE)),
                alignment = Alignment.CenterEnd
            )
        }
    }


    @Preview
    @Composable
    fun ComposablePreview(){
        //MainContent()
    }
}
- jetpack compose - Navigation drawer example
- jetpack compose - How to use Scaffold
- jetpack compose - RectangleShape example
- jetpack compose - Rounded corner shape example
- jetpack compose - Circle shape example
- jetpack compose - Cut corner shape example
- jetpack compose - Image from drawable
- jetpack compose - Image from bitmap
- jetpack compose - Circular image example
- jetpack compose - Image from URL
- jetpack compose - Get color resource
- jetpack compose - LazyColumn sticky header
- jetpack compose - Keyframes animation
- jetpack compose - Infinite color animation
- jetpack compose - Rotate canvas