Create a DataTable with distinct rows from a DataView
The DataView is a customized view of a DataTable for sorting, filtering,
searching, editing, and navigation. The DataView does not store data. When the
asp.net developer changes the DataView's data that will affect the DataTable.
But when they change the DataTable's data that will affect all associated
DataViews. The DataView is much like a database view.
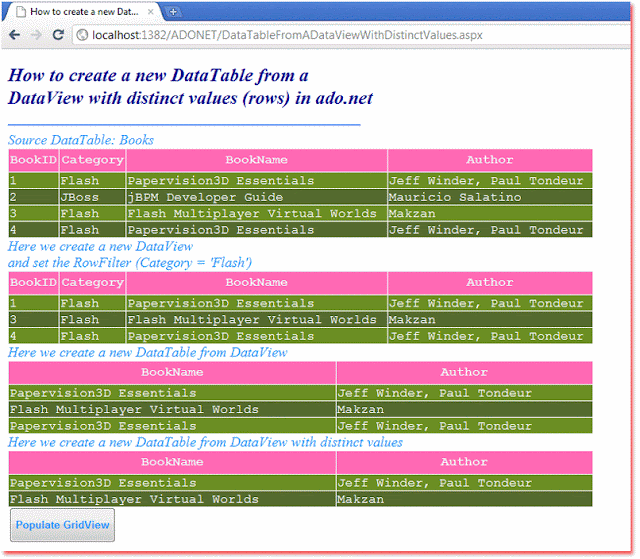
The DataTable class represents one table of in-memory data. The DataTable is a central object in the ADO.NET library. The DataSet and DataView objects use DataTable.The following asp.net c# tutorial code demonstrates how we can create a DataTable with distinct rows from a DataView. Here we used the DataView class ToTable() method’s specified overload to create a DataTable with distinct rows from a specified DataView instance.
The DataView class ToTable() method creates and returns a new DataTable based on rows in an existing DataView. In the DataView class ToTable() method’s specified overload we passed a Boolean value that indicates whether the returned DataTable contains rows that have distinct values for all its columns or not.
The default value of this parameter is false. If this parameter value is set to true then the returned DataTable contains rows that have distinct values for all its columns. We also pass the column names to this method overload to distinct the rows based on them while creating the new DataTable.
The DataView ToTable() method returns a new DataTable instance that contains the requested rows and columns.The asp.net developers can use the overloaded version of the ToTable() method when they want to retrieve distinct values in a subset of available columns, specifying a new name for the returned DataTable.
DataTableFromADataViewWithDistinctValues.aspx
<%@ Page Language="C#" AutoEventWireup="true" %>
<%@ Import Namespace="System.Data" %>

<!DOCTYPE html>
<script runat="server">
    protected void Button1_Click(object sender, System.EventArgs e)
    {
        DataTable dt = new DataTable();
        dt.TableName = "Books";

        DataColumn dc1 = new DataColumn();
        dc1.ColumnName = "BookID";
        dc1.DataType = typeof(int);
        dc1.AllowDBNull = false;
        dc1.Unique = true;

        DataColumn dc2 = new DataColumn();
        dc2.ColumnName = "Category";
        dc2.DataType = typeof(string);

        DataColumn dc3 = new DataColumn();
        dc3.ColumnName = "BookName";
        dc3.DataType = typeof(string);

        DataColumn dc4 = new DataColumn();
        dc4.ColumnName = "Author";
        dc4.DataType = typeof(string);

        dt.Columns.AddRange(new DataColumn[] { dc1, dc2, dc3, dc4 });

        dt.Rows.Add(new object[] { 1, "Flash", "Papervision3D Essentials", "Jeff Winder, Paul Tondeur" });
        dt.Rows.Add(new object[] { 2, "JBoss", "jBPM Developer Guide", "Mauricio Salatino" });
        dt.Rows.Add(new object[] { 3, "Flash", "Flash Multiplayer Virtual Worlds", "Makzan" });
        dt.Rows.Add(new object[] { 4, "Flash", "Papervision3D Essentials", "Jeff Winder, Paul Tondeur" });
        dt.AcceptChanges();

        Label1.Text = "Source DataTable: " + dt.TableName;
        GridView1.DataSource = dt.DefaultView;
        GridView1.DataBind();

        //this line create a new DataView
        DataView dView = new DataView(dt);
        dView.RowFilter = "Category = 'Flash'";

        Label2.Text = "Here we create a new DataView<br />" +
                      "and set the RowFilter (Category = 'Flash')";

        GridView2.DataSource = dView;
        GridView2.DataBind();

        //this line create a new DataTable from DataView
        DataTable dt2 = dView.ToTable(false, "BookName", "Author");

        Label3.Text = "Here we create a new DataTable from DataView";

        GridView3.DataSource = dt2;
        GridView3.DataBind();

        //this line create a new DataTable from DataView with distinct values
        DataTable dt3 = dView.ToTable(true, "BookName", "Author");

        Label4.Text = "Here we create a new DataTable from DataView with distinct values";

        GridView4.DataSource = dt3;
        GridView4.DataBind();
    }
</script>

<html xmlns="http://www.w3.org/1999/xhtml">
<head id="Head1" runat="server">
    <title>How to create a new DataTable from a DataView with distinct values (rows) in ado.net</title>
</head>
<body>
    <form id="form1" runat="server">
    <div>
        <h2 style="color:DarkBlue; font-style:italic;">
            How to create a new DataTable from a
            <br /> DataView with distinct values (rows) in ado.net
        </h2>
        <hr width="450" align="left" color="CornFlowerBlue" />
        <asp:Label
             ID="Label1"
             runat="server"
             Font-Size="Large"
             ForeColor="DodgerBlue"
             Font-Italic="true"
             >
        </asp:Label>
        <asp:GridView
            ID="GridView1"
            runat="server"
            BorderColor="Snow"
            ForeColor="Snow"
            Width="750"
            Font-Names="Courier"
            >
            <HeaderStyle BackColor="HotPink" Height="30" />
            <RowStyle BackColor="OliveDrab" />
            <AlternatingRowStyle BackColor="DarkOliveGreen" />
        </asp:GridView>
        <asp:Label
             ID="Label2"
             runat="server"
             Font-Size="Large"
             ForeColor="DodgerBlue"
             Font-Italic="true"
             >
        </asp:Label>
        <asp:GridView
            ID="GridView2"
            runat="server"
            BorderColor="Snow"
            ForeColor="Snow"
            Width="750"
            Font-Names="Courier"
            >
            <HeaderStyle BackColor="HotPink" Height="30" />
            <RowStyle BackColor="OliveDrab" />
            <AlternatingRowStyle BackColor="DarkOliveGreen" />
        </asp:GridView>
        <asp:Label
             ID="Label3"
             runat="server"
             Font-Size="Large"
             ForeColor="DodgerBlue"
             Font-Italic="true"
             >
        </asp:Label>
        <asp:GridView
            ID="GridView3"
            runat="server"
            BorderColor="Snow"
            ForeColor="Snow"
            Width="750"
            Font-Names="Courier"
            >
            <HeaderStyle BackColor="HotPink" Height="30" />
            <RowStyle BackColor="OliveDrab" />
            <AlternatingRowStyle BackColor="DarkOliveGreen" />
        </asp:GridView>
        <asp:Label
             ID="Label4"
             runat="server"
             Font-Size="Large"
             ForeColor="DodgerBlue"
             Font-Italic="true"
             >
        </asp:Label>
        <asp:GridView
            ID="GridView4"
            runat="server"
            BorderColor="Snow"
            ForeColor="Snow"
            Width="750"
            Font-Names="Courier"
            >
            <HeaderStyle BackColor="HotPink" Height="30" />
            <RowStyle BackColor="OliveDrab" />
            <AlternatingRowStyle BackColor="DarkOliveGreen" />
        </asp:GridView>
        <asp:Button
            ID="Button1"
            runat="server"
            OnClick="Button1_Click"
            Text="Populate GridView"
            Height="45"
            Font-Bold="true"
            ForeColor="DodgerBlue"
            />
    </div>
    </form>
</body>
</html>