How to use ListView control in asp.net

ListView Web Server Control
ListView is an ASP.NET web server control. ListView allows us to data bind with DataSource and display data. We can show ListView data items on pages. ListView can display data items individually or it can group data items.

.NET developers can format data using templates and styles in a ListView control. ListView is popular for displaying data in any repeating structure. It is a similar server control to the DataList and Repeater server control. But ListView has more facilities such as the user can edit, update, insert, delete, sort, and even page data. All those are ListView built-in features, so you don't need to code for any one facility.

LisView can data bind with SqlDataSource control using its DataSourceID property. By binding data with data source control we can get its built-in advantage such as paging data, sorting data, inserting, deleting, and editing data.

ListView DataSource property allows us to data bind with many objects such as ADO.NET DataSet and DataReader. But if you use the DataSource property, you need to write code for paging, sorting, editing, etc functionality.

ListView allows .NET developers to display data as individual items or in groups. Developers can define data items by templates. ListView templates are similar to DataList and Repeater control.

If you use a ListView layout template then you need to create a LayoutTemplate. The LayoutTemplate must have the control that acts as a data placeholder. PlaceHolder output each item as defined ItemTemplate. GroupTemplate allows .NET developers to group ListView data.

ListView control used templates are LayoutTemplate, ItemTemplate, ItemSeparatorTemplate, GroupTemplate, GroupSeparatorTemplate, EmptyItemTemplate, EmptyDataTemplate, SelectedItemTemplate, AlternatingItemTemplate, EditItemTemplate, and InsertItemTemplate.

To enable ListView data paging we can use DataPager server control inside LayoutTemplate. EditItemTemplate allows us to edit ListView data and InsertItemTemplate allows us to insert new data.

The following example source code will help you to better understand how ListView works in ASP.NET.
ListView.aspx

<%@ Page Language="C#" AutoEventWireup="true" %>

<!DOCTYPE html>

<script runat="server">

</script>
<html xmlns="http://www.w3.org/1999/xhtml" >
<head id="Head1" runat="server">
    <title>ListView control - how to use ListView control in asp.net</title>
    <style type="text/css">
        .TableCSS
        {
            border-style:none;
            background-color:DarkOrange;
            width: 600px;
            }
        .TableHeader
        {
            background-color:OrangeRed;
            color:Snow;
            font-size:large;
            font-family:Verdana;
            }    
        .TableData
        {
            background-color:Orange;
            color:Snow;
            font-family:Courier New;
            font-size:medium;
            font-weight:bold;
            }                    
    </style>
</head>
<body>
    <form id="form1" runat="server">
    <div>
        <h2 style="color:Navy; font-style:italic;">ListView Control Example: How To Use ListView Control</h2>
        <hr width="550" align="left" color="PowderBlue" />
        <asp:SqlDataSource 
            ID="SqlDataSource1"
            runat="server"
            ConnectionString="<%$ ConnectionStrings:NorthwindConnectionString %>"
            SelectCommand="Select ProductID, ProductName From products Order By ProductID"
            >
        </asp:SqlDataSource>
        <br />
        <asp:ListView 
            ID="ListView1"
            runat="server"
            DataSourceID="SqlDataSource1"
            >

            <LayoutTemplate>
                <table runat="server" class="TableCSS">
                    <tr runat="server" class="TableHeader">
                        <td runat="server">Product ID</td>
                        <td runat="server">Product Name</td>
                    </tr>
                    <tr id="ItemPlaceholder" runat="server">
                    </tr>
                    <tr runat="server">
                        <td runat="server" colspan="2">
                            <asp:DataPager ID="DataPager1" runat="server">
                                <Fields>
                                    <asp:NextPreviousPagerField ButtonType="Link" />
                                    <asp:NumericPagerField />
                                    <asp:NextPreviousPagerField ButtonType="Link" />
                                </Fields>
                            </asp:DataPager>
                        </td>
                    </tr>
                </table>
            </LayoutTemplate>
            <ItemTemplate>
                <tr class="TableData">
                    <td>
                        <asp:Label 
                            ID="Label1"
                            runat="server"
                            Text='<%# Eval("ProductID")%>'
                            >
                        </asp:Label>
                    </td>
                    <td>
                        <asp:Label 
                            ID="Label2"
                            runat="server"
                            Text='<%# Eval("ProductName")%>'
                            >
                        </asp:Label>
                    </td>
                </tr>                
            </ItemTemplate>
        </asp:ListView>
    </div>
    </form>
</body>
</html>

cfqueryparam- how to use cfqueryparam in cfquery tag

cfqueryparam

Usingcfqueryparam.cfm


<!DOCTYPE html>
<html xmlns="http://www.w3.org/1999/xhtml">
<head>
    <meta http-equiv="Content-Type" content="text/html; charset=utf-8" />
    <title>cfqueryparam- how to use cfqueryparam in cfquery tag</title>
</head>

<body>
<h2 style="color:DarkBlue; font-style:italic">ColdFusion cfqueryparam tag example: how to use cfqueryparam</h2>
<hr width="600" align="left" color="PowderBlue" />
<br />


<cfparam name="url.BookID" default="0">

<cfquery name="Books" datasource="cfbookclub">
 select BookID, Title from Books
    where BookID = <cfqueryparam value="#url.BookID#" cfsqltype="cf_sql_integer">
</cfquery>

<div style="font-family:'Courier New', Courier, monospace; font-size:large;">
    <a href="Usingcfqueryparam.cfm?BookID=1">Book ID = 1</a> <br />
    <a href="Usingcfqueryparam.cfm?BookID=2">Book ID = 2</a> <br />
    <a href="Usingcfqueryparam.cfm?BookID=3">Book ID = 3</a> <br />
    <a href="Usingcfqueryparam.cfm?BookID=4">Book ID = 4</a> <br />
</div>
<br />

<table border="0" cellpadding="2" cellspacing="2" bgcolor="OrangeRed" width="350">
 <tr style="background-color:DeepPink; color:Snow; font-weight:bold;">
     <td>
   Book ID        
        </td>
     <td>
         Title
        </td>
    </tr>
 <cfoutput query="Books">
        <tr style="color:Snow; background-color:HotPink; font-family:'Courier New', Courier, monospace;">
            <td>
                #BookID#        
            </td>
            <td>
                #Title#
            </td>
        </tr>
    </cfoutput>
</table>

</body>
</html>


More ColdFusion tutorials

How to use cfsqltype in cfqueryparam tag in ColdFusion

CFqueryparam and CFsqltype

Usingcfsqltype.cfm


<!DOCTYPE html>
<html xmlns="http://www.w3.org/1999/xhtml">
<head>
    <meta http-equiv="Content-Type" content="text/html; charset=utf-8" />
    <title>cfqueryparam and cfsqltype - how to use cfsqltype in cfqueryparam tag</title>
</head>

<body>
<h2 style="color:DarkBlue; font-style:italic">ColdFusion cfqueryparam tag example: how to use cfsqltype</h2>
<hr width="600" align="left" color="PowderBlue" />
<br />


<cfparam name="url.EmpID" default="0">

<cfquery name="qEmploees" datasource="cfdocexamples">
 select Emp_ID, FirstName, LastName from Employee
    where Emp_ID = <cfqueryparam value="#url.EmpID#" cfsqltype="cf_sql_integer">
</cfquery>

<div style=" font-family:'Lucida Sans Unicode', 'Lucida Grande', sans-serif; font-size:large;">
    <a href="Usingcfsqltype.cfm?EmpID=1">Employee ID = 1</a> <br />
    <a href="Usingcfsqltype.cfm?EmpID=2">Employee ID = 2</a> <br />
    <a href="Usingcfsqltype.cfm?EmpID=3">Employee ID = 3</a> <br />
</div>
<br />

<table border="0" cellpadding="2" cellspacing="2" bgcolor="OrangeRed" width="350">
 <tr style="background-color:DeepPink; color:Snow; font-weight:bold;">
     <td>
   Employee ID        
        </td>
     <td>
         First Name
        </td>
     <td>
         Last Name
        </td>
    </tr>
 <cfoutput query="qEmploees">
        <tr style="color:Snow; background-color:HotPink; font-family:'Courier New', Courier, monospace;">
            <td>
                #EmpID#        
            </td>
            <td>
                #FirstName#
            </td>
            <td>
                #LastName#
            </td>
        </tr>
    </cfoutput>
</table>

</body>
</html>


More ColdFusion tutorials

How to cache query data in session scope in ColdFusion

Session scopes query caching - cache query data in session scope

QueryCacheSessionScope.cfm


<!DOCTYPE html>
<html xmlns="http://www.w3.org/1999/xhtml">
<head>
    <meta http-equiv="Content-Type" content="text/html; charset=utf-8" />
    <title>Session scopes query caching - how to cache query data in session scope</title>
</head>

<body>
<h2 style="color:Crimson; font-style:italic">ColdFusion query caching example: how to cache query in session scope</h2>
<hr width="600" align="left" color="LightPink" />
<br />

<!--at first enable session management in application.cfm file-->

<cfset Session.UserName="cfsuman">

<cfquery name="Session.Authors" datasource="cfbookclub" maxrows="2">
 select AuthorID, FirstName, LastName from Authors
</cfquery>

<cfdump var="#Session#" label="Session">
<br />

<table border="0" cellpadding="2" cellspacing="2" bgcolor="OrangeRed">
 <tr style="background-color:DeepPink; color:Snow; font-weight:bold;">
     <td>
   Author ID        
        </td>
     <td>
         First Name
        </td>
     <td>
         Last Name
        </td>
    </tr>
 <cfoutput query="Session.Authors">
        <tr style="color:Snow; background-color:HotPink; font-family:'Courier New', Courier, monospace;">
            <td>
                #AuthorID#        
            </td>
            <td>
                #FirstName#
            </td>
            <td>
                #LastName#
            </td>
        </tr>
    </cfoutput>
</table>

</body>
</html>


More ColdFusion tutorials

How to use NOT EQUAL operator in cfif condition in ColdFusion

Introduction

In ColdFusion web development, control flow plays a critical role in dictating the behavior of web applications based on specific conditions. One of the most fundamental ways to manage this control flow is through the cfif tag, which allows for the evaluation of conditions and the execution of corresponding blocks of code. In this tutorial, we explore how to use the "NOT EQUAL" operator within a cfif condition. This operator enables developers to execute different blocks of code when two values do not match, making it an essential tool for implementing conditional logic in ColdFusion applications.

This article will break down the example code step-by-step to explain the key elements involved, from defining variables to styling the output. By the end of this guide, you’ll have a better understanding of how the "NOT EQUAL" operator works within ColdFusion’s cfif structure, and how you can apply this in your own web development projects.

Variable Declaration

At the beginning of the code, a variable named UserID is defined using the cfset tag. The value assigned to UserID is 5. This value is later used in the conditional statement to determine whether the user should be granted access or denied. The purpose of this variable is to simulate a user identification number, where different values could represent different levels of access or user roles. In this case, we are checking if the user has administrative access based on their UserID.

The cfif Conditional Statement

The core of this example revolves around the cfif statement, which acts as an "if-else" structure in ColdFusion. Here, the "NOT EQUAL" operator (NOT EQUAL) is employed to compare the value of UserID against the number 2. If UserID is not equal to 2, the message "Sorry, you are not allowed!" is displayed to the user. This condition controls the logic flow, ensuring that users who do not meet the required criteria (in this case, UserID of 2) are denied access.

The cfelse tag acts as the counterpart to the cfif statement. If the initial condition is false (i.e., if UserID equals 2), the code within the cfelse block is executed instead, displaying the message "Welcome admin!" This creates a clear distinction between authorized and unauthorized users.

Styling the Output

To enhance the presentation of the output, CSS styling is applied within the <style> block and an external <div> element. The class divCSS is defined with a background color of "OrangeRed" and text color set to "White." These choices help to make the message highly visible and distinct. The text is styled using the Georgia font family, with a large font size to emphasize the content. The size and alignment of the div are also specified, ensuring that the message is centered both vertically and horizontally within a designated area.

This styling ensures that the output not only conveys the conditional message but also looks visually appealing on the webpage, enhancing the user experience.

Output Based on Conditions

When a user visits this page, ColdFusion checks the value of UserID and runs the appropriate code block based on whether the value matches 2. If the UserID is anything other than 2, the "Sorry, you are not allowed!" message is displayed. However, if the UserID is set to 2, the user is greeted with a "Welcome admin!" message. This is a simple but effective demonstration of how conditional logic can control access to different areas of a website.

Conclusion

In this tutorial, we’ve explored how to use the "NOT EQUAL" operator within ColdFusion’s cfif statement to evaluate conditions. By comparing the UserID variable to a specific value, we were able to demonstrate how different content can be served based on user status. The use of the cfelse tag allowed for the execution of an alternative code block, providing a way to handle both positive and negative conditions.

Understanding how to use the "NOT EQUAL" operator and control conditional logic is vital for developing dynamic and secure ColdFusion applications. Whether you’re checking user access levels, managing content display, or handling form submissions, the cfif tag with its comparison operators forms the backbone of decision-making in ColdFusion applications.


cfifNOTEQUALOperator.cfm

<!DOCTYPE html>

<html xmlns="http://www.w3.org/1999/xhtml">
<head>
    <meta http-equiv="Content-Type" content="text/html; charset=utf-8" />
    <title>cfif NOT EQUAL operator - how to use (NOT EQUAL) operator in cfif condition</title>
    <style type="text/css">
  .divCSS
  {
   background-color:OrangeRed;
   color:White;
   font-family:Georgia, "Times New Roman", Times, serif;
   font-size:X-large;
   width:425px;
   height:70px;
   text-align:center;
   padding-top:25px;
   }
 </style>
</head>

<body>
<h2 style="color:SeaGreen; font-style:italic">coldfusion cfif tag example: how to use "NOT EQUAL" operator</h2>
<hr width="575" align="left" color="LawnGreen" />
<br />


<cfset UserID=5>

<div class="divCSS">
 <cfif UserID NOT EQUAL 2 >
        Sorry you are not allowed!
    <cfelse>
        Wellcome admin!
    </cfif>
</div>

</body>
</html>


More ColdFusion tutorials

How to use NEQ operator in cfif condition in ColdFusion

CFif NEQ operator

cfifNEQOperator.cfm


<!DOCTYPE html>
<html xmlns="http://www.w3.org/1999/xhtml">
<head>
    <meta http-equiv="Content-Type" content="text/html; charset=utf-8" />
    <title>cfif NEQ operator - how to use (NEQ) operator in cfif condition</title>
    <style type="text/css">
  .divCSS
  {
   background-color:Crimson;
   color:White;
   font-family:"Trebuchet MS", Arial, Helvetica, sans-serif;
   font-size:large;
   width:400px;
   height:60px;
   text-align:center;
   padding-top:10px;
   border:thick;
   border-style:dotted;
   }
 </style>
</head>

<body>
<h2 style="color:SeaGreen; font-style:italic">coldfusion cfif tag example: how to use "NEQ" operator</h2>
<hr width="575" align="left" color="LawnGreen" />
<br />


<cfset UserRole="Guest">

<div class="divCSS">
 <cfif UserRole NEQ "Admin" >
        Sorry guest are not allowed to see the secret number!
    <cfelse>
        Wellcome!<br /> your secret number is: 255
    </cfif>
</div>

</body>
</html>


More ColdFusion tutorials

ColdFusion - How to use IS NOT operator in cfif conditional processing

CFif IS NOT operator

cfifISNOTOperator.cfm


<!DOCTYPE html>
<html xmlns="http://www.w3.org/1999/xhtml">
<head>
    <meta http-equiv="Content-Type" content="text/html; charset=utf-8" />
    <title>cfif IS NOT operator - how to use (IS NOT) operator in cfif conditional processing</title>
    <style type="text/css">
  .divCSS
  {
   background-color:DeepPink;
   color:Snow;
   font-family:"Courier New", Courier, monospace;
   font-size:large;
   width:450px;
   height:75px;
   text-align:center;
   padding-top:25px;
   }
 </style>
</head>

<body>
<h2 style="color:SeaGreen; font-style:italic">coldfusion cfif tag example: how to use "IS NOT" operator</h2>
<hr width="550" align="left" color="DarkSeaGreen" />
<br />


<cfset PreferedColor="DodgerBlue">

<div class="divCSS">
 <cfif PreferedColor IS NOT "Crimson">
        Your prefered color is not: Crimson
    <cfelse>
        Your prefered color is: Crimson    
    </cfif>
</div>

</body>
</html>


More ColdFusion tutorials

How to use variable prefixes in ColdFusion

ColdFusion variable prefixes

VariablePrefixes.cfm


<!DOCTYPE html>
<html xmlns="http://www.w3.org/1999/xhtml">
<head>
    <meta http-equiv="Content-Type" content="text/html; charset=utf-8" />
    <title>coldfusion variable prefixes - how to use in coldfusion application</title>
</head>

<body>
<h2 style="color:DarkBlue; font-style:italic">coldfusion variable prefixes example: how to use</h2>
<hr width="500" align="left" color="LightBlue" />
<br />
<!--enable session management in application.cfm file-->

<cfset Variables.MyNumber=2>
<cfset Session.MyNumber=5>
<cfset Application.MyNumber=10>
<cfset Total=MyNumber+MyNumber+MyNumber>
<cfset TotalWithPrefixes=Variables.MyNumber+Session.MyNumber+Application.MyNumber>


<table border="0" cellpadding="2" cellspacing="2" bgcolor="OrangeRed">
 <tr style="background-color:Crimson; color:Snow; font-size:large;">
     <td>Variable=Value</td>
     <td>Output</td>
    </tr>
 <cfoutput>
        <tr style="background-color:HotPink; color:Snow;">
            <td>Variables.MyNumber=2</td>
            <td>#Variables.MyNumber#</td>
        </tr>
        <tr style="background-color:HotPink; color:Snow;">
            <td>Session.MyNumber=5</td>
            <td>#Session.MyNumber#</td>
        </tr>
        <tr style="background-color:HotPink; color:Snow;">
            <td>Application.MyNumber=10</td>
            <td>#Application.MyNumber#</td>
        </tr>
        <tr style="background-color:HotPink; color:Snow;">
            <td>Total=MyNumber+MyNumber+MyNumber</td>
            <td>#Total#</td>
        </tr>
        <tr style="background-color:HotPink; color:Snow;">
            <td>TotalWithPrefixes=Variables.MyNumber+Session.MyNumber+Application.MyNumber</td>
            <td>#TotalWithPrefixes#</td>
        </tr>
 </cfoutput>    
</table>

</body>
</html>


More ColdFusion tutorials

ColdFusion variables typeless feature

ColdFusion Variables are typeless

TypelessVariables.cfm


<!DOCTYPE html>
<html xmlns="http://www.w3.org/1999/xhtml">
<head>
    <meta http-equiv="Content-Type" content="text/html; charset=utf-8" />
    <title>ColdFusion Variables are typeless - how to test variables typeless feature</title>
</head>

<body>
<h2 style="color:SeaGreen; font-style:italic">ColdFusion Variables are typeless example: how to verify</h2>
<hr width="600" align="left" color="DarkSeaGreen" />
<br />

<cfset TestNumber=5>

<cfset TestString="20">
<cfset SampleMath=TestNumber*TestString>
<cfset SampleString="First Number: " & TestNumber & " Second Number: " & TestString>

<table border="0" cellpadding="2" cellspacing="2" bgcolor="OrangeRed">
 <tr style="background-color:Crimson; color:Snow; font-size:large;">
     <td>Variable=Value</td>
     <td>Output</td>
    </tr>
 <cfoutput>
        <tr style="background-color:HotPink; color:Snow;">
            <td>TestNumber=5</td>
            <td>#TestNumber#</td>
        </tr>
        <tr style="background-color:HotPink; color:Snow;">
            <td>TestString="20"</td>
            <td>#TestString#</td>
        </tr>
        <tr style="background-color:HotPink; color:Snow;">
            <td>SampleMath=TestNumber*TestString</td>
            <td>#SampleMath#</td>
        </tr>
        <tr style="background-color:HotPink; color:Snow;">
            <td>SampleString="First Number: " & TestNumber & " Second Number: " & TestString</td>
            <td>#SampleString#</td>
        </tr>
 </cfoutput>    
</table>

</body>
</html>


More ColdFusion tutorials

ColdFusion number and date format mask

coldfusion functions masks

FunctionsMasks.cfm


<!DOCTYPE html>
<html xmlns="http://www.w3.org/1999/xhtml">
<head>
    <meta http-equiv="Content-Type" content="text/html; charset=utf-8" />
    <title>coldfusion functions masks - how to use masks in coldfusion functions</title>
</head>

<body>
<h2 style="color:DarkBlue; font-style:italic">coldfusion functions masks example: how to use</h2>
<hr width="450" align="left" color="LightBlue" />
<br />

<cfset Salary=1525>
<cfset SalaryWithMask=NumberFormat(Salary,"$")>
<cfset ToDay=DateFormat(Now())>
<cfset ToDayWithMask=DateFormat(Now(),"mmmm-dd-yyyy")>

<table border="0" cellpadding="2" cellspacing="2" bgcolor="DeepPink" width="250">
 <tr style="background-color:OrangeRed; color:Snow; font-size:large;">
     <td>Variable=Value</td>
     <td>Output</td>
    </tr>
 <cfoutput>
        <tr style="background-color:HotPink; color:Snow; font-family:'Courier New', Courier, monospace">
            <td>Salary=1525</td>
            <td>#Salary#</td>
        </tr>
        <tr style="background-color:HotPink; color:Snow; font-family:'Courier New', Courier, monospace">
            <td>SalaryWithMask=NumberFormat(Salary,"$")</td>
            <td>#SalaryWithMask#</td>
        </tr>
        <tr style="background-color:HotPink; color:Snow; font-family:'Courier New', Courier, monospace">
            <td>ToDay=DateFormat(Now())</td>
            <td>#ToDay#</td>
        </tr>
        <tr style="background-color:HotPink; color:Snow; font-family:'Courier New', Courier, monospace">
            <td>ToDayWithMask=DateFormat(Now(),"mmmm-dd-yyyy")</td>
            <td>#ToDayWithMask#</td>
        </tr>
    </cfoutput>
</table>

</body>
</html>


More ColdFusion tutorials

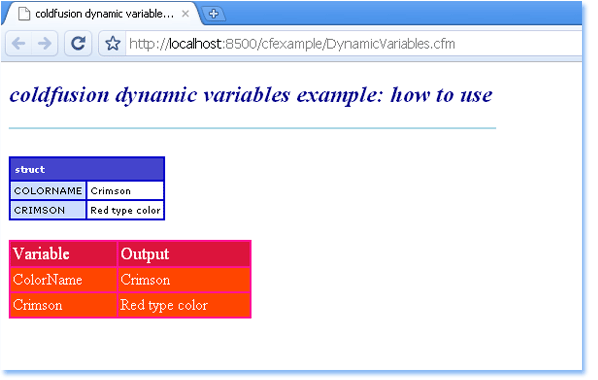
ColdFusion dynamic variables

coldfusion dynamic variables

DynamicVariables.cfm


<!DOCTYPE html>
<html xmlns="http://www.w3.org/1999/xhtml">
<head>
    <meta http-equiv="Content-Type" content="text/html; charset=utf-8" />
    <title>coldfusion dynamic variables - how to create and use in coldfusion</title>
</head>

<body>
<h2 style="color:DarkBlue; font-style:italic">coldfusion dynamic variables example: how to use</h2>
<hr width="500" align="left" color="LightBlue" />
<br />

<cfset ColorName="Crimson">
<cfset "#ColorName#"="Red type color">

<cfdump var="#Variables#">
<br />

<table border="0" cellpadding="2" cellspacing="2" bgcolor="DeepPink" width="250">
 <tr style="background-color:Crimson; color:Snow; font-size:large;">
     <td>Variable</td>
     <td>Output</td>
    </tr>
 <cfoutput>
        <tr style="background-color:OrangeRed; color:Snow;">
            <td>ColorName</td>
            <td>#ColorName#</td>
        </tr>
        <tr style="background-color:OrangeRed; color:Snow;">
            <td>Crimson</td>
            <td>#Crimson#</td>
        </tr>
 </cfoutput>    
</table>

</body>
</html>


More ColdFusion tutorials

How to get coldfusion DataSource list programmatically

Get ColdFusion DataSource list programmatically

GetDataSourceList.cfm


<!DOCTYPE html>
<html xmlns="http://www.w3.org/1999/xhtml">
<head>
    <meta http-equiv="Content-Type" content="text/html; charset=utf-8" />
    <title>DataSource List - how to get coldfusion DataSource list programmatically</title>
</head>

<body>
<h2 style="color:Crimson; font-style:italic">DataSource example: how to get DataSource list</h2>
<hr width="500" align="left" color="LightPink" />
<br />

<cfobject 
 action="create"
    type="java"
    class="coldfusion.server.ServiceFactory" 
    name="cfactory"
    >
<cfset DSourceStruct=cfactory.getDataSourceService().getDataSources()>
<cfset DSourceList=StructKeyList(DSourceStruct,",")>


<table border="1" cellpadding="2" cellspacing="2" bordercolor="Pink" bgcolor="DeepPink" width="350">
 <tr style="color:Snow; font-weight:bold; font-size:large; font-family:'Courier New', Courier, monospace;" height="35">
     <td>
         ColdFusion DataSource List
        </td>
    </tr>
 <cfoutput>
        <cfloop index="i" list="#DSourceList#">
            <tr style="font-weight:bold; font-style:normal; color:Snow;">
                <td bgcolor="HotPink">
                    #i#
                </td>
            </tr>
            </cfloop>
        </cfoutput>
</table>

</body>
</html>


More ColdFusion tutorials

How to dump and get output server variables in coldfusion

Server variables

serverVariables.cfm


<!DOCTYPE html">
<html xmlns="http://www.w3.org/1999/xhtml">
<head>
    <meta http-equiv="Content-Type" content="text/html; charset=utf-8" />
    <title>server variables - how to dump and get output server variables</title>
</head>

<body>
<h2 style="color:DodgerBlue; font-style:italic">coldfusion server variables example: how to get output</h2>
<hr width="500" align="left" color="PowderBlue" />
<br />

<cfdump var="#server#">
<br />


<font style="font-weight:bold; color:SeaGreen; font-size:large;">example server variable Output</font>
<br />

<font style="color:DeepPink; font-weight:bold; font-family:'Courier New', Courier, monospace;">
    PRODUCT VERSION[#server.ColdFusion.PRODUCTVERSION#]: <cfoutput>#server.ColdFusion.PRODUCTVERSION#</cfoutput>
</font>

</body>
</html>


More ColdFusion tutorials

How to Create a Microsoft Word Document in ColdFusion

Introduction

In web development, generating documents dynamically, such as Microsoft Word files, can be highly valuable for businesses and users. ColdFusion, a powerful and flexible web development platform, allows developers to easily create Word documents using its built-in cfcontent tag. This tutorial demonstrates a practical example of how to output database query results into a Microsoft Word document using ColdFusion, showcasing how user-friendly the process can be.

In this tutorial, we will cover two ColdFusion scripts: one for creating a hyperlink that triggers the Word document generation and another that processes the data from a database query and outputs it as a Word document. The focus will be on using the cfcontent tag to define the MIME type for Word files and how to structure and output the desired content.

Overview of cfcontentMSWord.cfm

The first part of the tutorial involves setting up a simple HTML page to serve as the user interface. The HTML file, named cfcontentMSWord.cfm, serves as a gateway for the user to click a link, which will trigger the generation of a Word document containing author data.

This file begins with a standard HTML structure, and within the <body> section, there is a heading styled with CSS to provide a visually appealing look. The key element here is the hyperlink that points to another ColdFusion file (cfcontentMSWord1.cfm). When clicked, this link executes a process that generates a Microsoft Word file containing a list of authors retrieved from a database.

Understanding the Query and Word Output in cfcontentMSWord1.cfm

The second file, cfcontentMSWord1.cfm, performs the core functionality of this tutorial. It begins by running a query that retrieves the first and last names of authors from a database named cfbookclub. This is achieved using ColdFusion's cfquery tag, which interacts with the database and stores the result in a query variable called authors.

Once the query is executed, the magic happens with the cfcontent tag. This tag is crucial for telling the browser how to handle the output. By setting the type attribute of the cfcontent tag to "application/msword", ColdFusion instructs the browser to treat the output as a Microsoft Word document. The reset="yes" attribute ensures that no extraneous HTML or headers are included in the output.

After setting the MIME type, the ColdFusion script outputs the data. A simple title, "Authors Name," is written at the top of the document, followed by a separator line. Then, the cfoutput tag is used to loop through the authors query results and display each author's last name followed by their first name. This will be formatted as plain text, but the result will be a .doc file that opens in Microsoft Word.

Generating the Word Document

Once the user clicks the link on the cfcontentMSWord.cfm page, the ColdFusion server processes the request and runs the query to fetch author names from the database. ColdFusion then dynamically generates a Word document using the cfcontent tag, sending the file to the user’s browser with the correct MIME type. This allows the user to download or open the Word document directly in Microsoft Word, where they can view the list of authors in a simple text format.

Conclusion

This tutorial demonstrates how easily you can generate Microsoft Word documents using ColdFusion’s cfcontent tag. By setting the MIME type and outputting dynamic content from a database query, ColdFusion automates document creation in a highly efficient manner. Whether you need to generate reports, lists, or any other text-based content, this approach allows for seamless integration into web applications.

By mastering this technique, ColdFusion developers can provide users with on-demand document generation, improving the overall user experience while maintaining flexibility and control over the content format.


cfcontentMSWord.cfm

<!DOCTYPE html>

<html xmlns="http://www.w3.org/1999/xhtml">
<head>
    <meta http-equiv="Content-Type" content="text/html; charset=utf-8" />
    <title>cfcontent application/msword - how to create Microsoft Word document  in coldfusion</title>
</head>

<body>
<h2 style="color:DarkSeaGreen; font-style:italic">cfcontent tag example: how to create Microsoft Word document</h2>
<hr width="625" align="left" color="DarkSeaGreen" />
<br />

<a href="cfcontentMSWord1.cfm">Click Here To Get Authors List In A MSWord File</a>

</body>
</html>


cfcontentMSWord1.cfm


<cfquery name="authors" datasource="cfbookclub">
 select FirstName, LastName from authors
</cfquery>

<cfcontent type="application/msword" reset="yes">
Authors Name
=============
<cfoutput query="authors">
 #LastName# #FirstName#
</cfoutput>


More ColdFusion tutorials

ColdFusion - how to create and dump Application variables

Application Variables

application.cfm


<cfapplication 
 name="cfexample"
    clientmanagement="yes" 
    sessionmanagement="yes" 
    sessiontimeout="#CreateTimeSpan(0,0,30,0)#"
    >

<cfset Application.Author.Name="cfsuman">
<cfset Application.Author.FavoriteColor="DeepPink">

<cfset Application.DSName="cfbookclub">
<cfset Application.Description="ColdFusion Example">


ApplicationVariables.cfm


<!DOCTYPE html>
<html xmlns="http://www.w3.org/1999/xhtml">
<head>
    <meta http-equiv="Content-Type" content="text/html; charset=utf-8" />
    <title>Application Variables: how to create and dump Application variables</title>
</head>

<body>
<h2 style="color:Crimson; font-style:italic">ColdFusion Application Variables example: how to create and dump</h2>
<hr width="600" align="left" color="LightPink" />
<br />

<cfdump var="#Application#">
<br />


<font style="font-weight:bold; color:Green; font-size:large;">Example Application Variable Output</font>
<br />

<font style="color:OrangeRed; font-weight:bold; font-family:'Courier New', Courier, monospace;">
    DataSource Name[#Application.DSName#]: <cfoutput>#Application.DSName#</cfoutput>
</font>

</body>
</html>


More ColdFusion tutorials

How to use AsyncFileUpload in asp.net ajax


AsyncFileUpload in asp.net ajax


AsyncFileUpload is an asp.net ajax control. AsyncFileUpload control allow us to asynchronously upload files
to web server. this control provide a way to check file uploading results both in the server side and client side.


AsyncFileUpload control have the following useful properties those are CompleteBackColor, ContentType, ErrorBackColor,
FileContent, FileName, HasFile, OnClientUploadComplete, OnClientUploadError, OnClientUploadStarted, PostedFile,
ThrobberID, UploaderStyle, UploadingBackColor, and Width.


AsyncFileUpload ajax control CompleteBackColor property value is a color name which color show as AsyncFileUpload
control's background color when upload complete. ErrorBackColor property set a color name which color display as
control's background color when file upload occurs an error. UploadingBackColor property assign a color name which color
show as control's background color when file upload is in progress.


AsyncFileUpload control's ContentType property get the MIME content type of a file which file sent by a client browser.
FileName property get the client uploaded file name. HasFile property indicate whether AsyncFileUpload control contains a file.
FileContent property gets a stream object of client uploaded file. PostedFile property get a HttpPostedFile object that allow access
to the uploaded file.


AsyncFileUpload control's each OnClientUploadStarted, OnClientUploadError and OnClientUploadComplete property set a
javascript function name that can be executed in the client side. OnClientUploadStarted specified javascript function
executed when file uploading started. OnClientUploadError specified function executed when file upload failed. when file upload
complete then the OnClientUploadComplete property specified javascript function executed on client side.


AsyncFileUpload control's UploaderStyle property have two possible values those are Traditional and Modern. this property
change the appearance (look and feel) of AsyncFileUpload control.


AsyncFileUpload control provides two events those are UploadedComplete and UploadedFileError.
AsyncFileUpload control's UploadedFileError event fired when uploaded file is corrupted.
UploadedComplete event fire when file successfully uploaded. both event fired on server side.


AsyncFileUpload asp.net ajax control also provide a method named SaveAs. this method require a string argument which ask
a filename. SaveAs method allow us to save the contents of an uploaded file.


UsingAsyncFileUpload.aspx


<%@ Page Language="C#" AutoEventWireup="true" %>

<%@ Register Assembly="AjaxControlToolkit" Namespace="AjaxControlToolkit" TagPrefix="cc1" %>

<!DOCTYPE html>

<script runat="server">
protected void UploadComplete(object sender, AjaxControlToolkit.AsyncFileUploadEventArgs e)
{
string filePath = Request.PhysicalApplicationPath+ "Image\\" + AsyncFileUpload1.PostedFile.FileName;
AsyncFileUpload1.SaveAs(filePath);
}
</script>
<script type="text/javascript">
function showConfirmation() {
document.getElementById('Label1').innerText = 'upload complete.';
}
</script>

<html xmlns="http://www.w3.org/1999/xhtml" >
<head id="Head1" runat="server">
<title>How to use AsyncFileUpload in asp.net ajax</title>
</head>
<body>
<form id="form1" runat="server">
<div>
<h2 style="color:OrangeRed; font-style:italic;">Ajax AsyncFileUpload Example: How To Use AsyncFileUpload</h2>
<hr width="650" align="left" color="salmon" />
<asp:ScriptManager
ID="ScriptManager1"
runat="server"
>
</asp:ScriptManager>
<cc1:AsyncFileUpload
ID="AsyncFileUpload1"
runat="server"
OnUploadedComplete="UploadComplete"
OnClientUploadComplete="showConfirmation"
BackColor="Pink"
/>
<br />
<asp:Label
ID="Label1"
runat="server"
Font-Size="Large"
>
</asp:Label>
</div>
</form>
</body>
</html>


How to use ValidatorCalloutExtender in asp.net ajax


ValidatorCalloutExtender


ValidatorCalloutExtender is an asp.net ajax control toolkit's extender control. ValidatorCalloutExtender
control enhances the functionality of existing asp.net validators.


The following asp.net ajax example code demonstrate us how can we use ValidatorCalloutExtender control. in this code
we created a TextBox control and a RequiredFieldValidor control. the RequiredFieldValidator control ensure that
the TextBox is a required field in the web form. we places a ValidatorCalloutExtender control to enhance the
RequiredFieldValidator control. when someone submit the form without inputting TextBox value the ValidatorCalloutExtender
show the error message in callout that was defined by the RequiredFieldValidator ErrorMessage property.


ValidatorCalloutExtender control's have the following properties those are TargetControlID, Width, CssClass, HighlightCssClass,
WarningIconImageUrl, CloseImageUrl and Animations.


ValidatorCalloutExtender control's TargetControlID property specify the asp.net validation server control that we want to extend.
Width property set the callout width.

WarningIconImageUrl property allow us to use a custom image icon for warning and CloseImageUrl allow to set a
custom close image.


Animations property allow us to apply generic animations for ValidatorCalloutExtender control. OnShow allow to play
animation each time the validation popup is displayed and OnHide allow to play animation each time the validation popup
is hidden.


asp.net developers can change the default design of ValidatorCalloutExtender's validation callout using CssClass and
HighlightCssClass property. HighlightCssClass property allow us to apply css style to invalid field.


UsingValidatorCalloutExtender.aspx


<%@ Page Language="C#" AutoEventWireup="true" %>

<%@ Register Assembly="AjaxControlToolkit" Namespace="AjaxControlToolkit" TagPrefix="cc1" %>

<!DOCTYPE html>

<script runat="server">
protected void Button1_Click(object sender, EventArgs e)
{
Label1.Text = "You submitted name: " + TextBox1.Text;
}
</script>

<html xmlns="http://www.w3.org/1999/xhtml" >
<head id="Head1" runat="server">
<title>Ajax ValidatorCalloutExtender - How to use ValidatorCalloutExtender in asp.net ajax</title>
</head>
<body>
<form id="form1" runat="server">
<div>
<h2 style="color:Green; font-style:italic;">Ajax Control Toolkit Example: Using ValidatorCalloutExtender</h2>
<hr width="575" align="left" color="LawnGreen" />
<asp:ScriptManager
ID="ScriptManager1"
runat="server"
>
</asp:ScriptManager>
<cc1:ValidatorCalloutExtender
ID="ValidatorCalloutExtender1"
runat="server"
TargetControlID="RequiredFieldValidator1"
>
</cc1:ValidatorCalloutExtender>
<asp:Label
ID="Label1"
runat="server"
ForeColor="Salmon"
Font-Size="Large"
Font-Names="Comic Sans MS"
>
</asp:Label>
<br /><br />
<asp:Label
ID="Label2"
runat="server"
Text="Name"
Font-Bold="true"
ForeColor="DeepPink"
>
</asp:Label>
<asp:TextBox
ID="TextBox1"
runat="server"
>
</asp:TextBox>
<asp:RequiredFieldValidator
ID="RequiredFieldValidator1"
runat="server"
ControlToValidate="TextBox1"
ErrorMessage="Input your name!"
Display="None"
>
</asp:RequiredFieldValidator>
<br /><br />
<asp:Button
ID="Button1"
runat="server"
Text="Submit Name"
Height="40"
Font-Bold="true"
ForeColor="DeepPink"
OnClick="Button1_Click"
/>
</div>
</form>
</body>
</html>


How to use SliderExtender in asp.net ajax


SliderExtender in asp.net ajax


SliderExtender is an asp.net ajax control toolkit's extender control. SliderExtender control allow asp.net developers
to upgrade a TextBox server control to a graphical slider. The slider provide a way to users to choose a numeric value
from a finite range.


When someone choose a value using the slider, it is automatically persisted during full or partial postbacks. asp.net
developers can continue to reference the TextBox to get and set the slider's value. A typical slider have three parts
those are a rail, a handle and a TextBox or label to show the slider's current value.


SliderExtender control's have the following properties those are TargetControlID, BoundControlID, Minimum, Maximum, Decimals,
Steps, Value, EnableHandleAnimation, HandleAnimationDuration, RailCssClass, HandleCssClass, HandleImageURL, Length, RaiseChangeOnlyOnMouseUp
and TooltipText.


SliderExtender TargetControlID property specify a TextBox server control which we want to extend as a Slider. BoundControlID property
also specify a TextBox or a Label control to display slider's value. Length property specify the Width of a horizontal slider
or height of a vertical slider when default layout is used.


TooltipText property display a text as tooltip when the slider's handle is hovered. The {0} placeholder in the text is replaced
with the current value of slider.


Minimum property specify the minimum value allowed in slider and Maximum property set the maximum allowed value. Decimals property specify the number of
decimal digits for the value. Steps property specify the number of discrete values inside slider's range. Value property indicate the current value
of slider.


EnableHandleAnimation property allow us to enable or disable handle animation of slider. If handle animation is enabled we can set the
animation duration in milliseconds using HandleAnimationDuration property.


If we set the RaiseChangeOnlyOnMouseUp property value to true, it fires the change event on the extended TextBox only when the left mouse button
is released.


HandleCssClass and RailCssClass property help us to change the look and feel (design) of slider's rail and handle using css.


UsingSliderExtender.aspx


<%@ Page Language="C#" AutoEventWireup="true" %>

<%@ Register Assembly="AjaxControlToolkit" Namespace="AjaxControlToolkit" TagPrefix="cc1" %>

<!DOCTYPE html>

<script runat="server">
protected void LinkButton1_Click(object sender, EventArgs e)
{
int imageWidth = Convert.ToInt32(TextBox2.Text);
Image1.Width = 1 * imageWidth;
}

</script>

<html xmlns="http://www.w3.org/1999/xhtml" >
<head id="Head1" runat="server">
<title>How to use SliderExtender in asp.net ajax</title>
</head>
<body>
<form id="form1" runat="server">
<div>
<h2 style="color:DarkSeaGreen; font-style:italic;">Ajax Control Toolkit Example: Using SliderExtender</h2>
<hr width="450" align="left" color="DarkSeaGreen" />
<asp:ScriptManager
ID="ScriptManager1"
runat="server"
>
</asp:ScriptManager>
<cc1:SliderExtender
ID="SliderExtender1"
runat="server"
TargetControlID="TextBox1"
BoundControlID="TextBox2"
Minimum="200"
Maximum="600"
>
</cc1:SliderExtender>
<br />
<table>
<tr>
<td>
<asp:TextBox
ID="TextBox1"
runat="server"
>
</asp:TextBox>
</td>
<td>
<asp:TextBox
ID="TextBox2"
runat="server"
ForeColor="Crimson"
Width="25"
>
</asp:TextBox>
</td>
<td>
<asp:LinkButton
ID="LinkButton1"
runat="server"
Text="Change Image Size"
ForeColor="DodgerBlue"
Font-Bold="true"
BorderColor="CornflowerBlue"
BorderWidth="1"
OnClick="LinkButton1_Click"
>
</asp:LinkButton>

</td>
</tr>
</table>
<br />
<asp:Image
ID="Image1"
runat="server"
ImageUrl="~/Images/Tiger.jpg"
Width="200"
/>
</div>
</form>
</body>
</html>

How to use TextBoxWatermarkExtender in asp.net ajax


TextBoxWatermarkExtender


TextBoxWatermarkExtender is an asp.net ajax control toolkit's extender control. TextBoxWatermarkExtender control can be
attached to an asp.net TextBox web server control. TextBoxWatermarkExtender control apply watermark behavior on target
TextBox server control.


When a watermarked textbox control is empty, it display a message in the text input area of the textbox with a custom css style.
if someone typed some text into the textbox control, the watermarked appearance goes away.


TextBoxWatermarkExtender control's properties are TargetControlID, WatermarkText and WatermarkCssClass.


TargetControlID property specify the TextBox server control which we want to extend for attach watermark behavior.
WatermarkText property set the message which we want to display in TextBox control when textbox has no value.
WatermarkCssClass represent a css class which we want to apply into the textbox control when textbox has no value.


Typically asp.net developers use a watermarked TextBox to display additional instruction to input text in TextBox without
wasting any space in web page.


The following asp.net ajax example source code demonstrates us how can we use TextBoxWatermarkExender control in web pages.


UsingTextBoxWatermarkExtender.aspx


<%@ Page Language="C#" AutoEventWireup="true" %>

<%@ Register Assembly="AjaxControlToolkit" Namespace="AjaxControlToolkit" TagPrefix="cc1" %>

<!DOCTYPE html>

<script runat="server">
protected void Button1_Click(object sender, EventArgs e)
{
Label1.Text = "Subscription Successful!";
}
</script>

<html xmlns="http://www.w3.org/1999/xhtml" >
<head id="Head1" runat="server">
<title>Ajax TextBoxWatermarkExtender - How to use TextBoxWatermarkExtender in asp.net ajax</title>
</head>
<body>
<form id="form1" runat="server">
<div>
<h2 style="color:DarkBlue; font-style:italic;">Ajax Control Toolkit Example: Using TextBoxWatermarkExtender</h2>
<hr width="550" align="left" color="LightBlue" />
<asp:ScriptManager
ID="ScriptManager1"
runat="server"
>
</asp:ScriptManager>
<cc1:TextBoxWatermarkExtender
ID="TexBoxWatermarkExtender1"
runat="server"
TargetControlID="TextBox1"
WatermarkText="Input your email"
>
</cc1:TextBoxWatermarkExtender>
<br />
<asp:Label
ID="Label1"
runat="server"
ForeColor="OrangeRed"
Font-Bold="true"
Font-Size="Large"
>
</asp:Label>
<br /><br />
<asp:TextBox
ID="TextBox1"
runat="server"
ForeColor="SeaGreen"
>
</asp:TextBox>
<asp:Button
ID="Button1"
runat="server"
Text="Subscribe RSS Feed"
OnClick="Button1_Click"
Height="30"
Font-Bold="true"
ForeColor="Green"
/>
</div>
</form>
</body>
</html>


How to use Accordion in asp.net ajax


Accordion and AccordionPane in asp.net ajax


Accordion is an asp.net ajax toolkit's control. Accordion web control provide multiple panes.
only one pane can display at a time in an Accordion control. Accordion is implemented as a web control.
an AccordionPane web control represent a pane in accordion. AccordionPane control built with a header template and
a content template. asp.net developers can track the selected pane so it stays visible across postback.


Accordion control support three auto size modes those are None, Limit and Fill. we can set Accordion auto
size mode by setting a value for its AutoSize property. AutoSize mode None allow the Accordion
grows or shrink without restriction. with this property Accordion size depends on pane content size. AutoSize mode Limit
set a maximum height for Accordion control. in this mode, if the pane content is higher than Accordion Height property then a scrollbar
appears in Accordion control. Fill mode stays the Accordion exacts same size as its Height property.


Accordion control can be data bound. we just need to specify Accordion control's DataSource or DataSourceID property.
after assigning property value we need to set data items in HeaderTemplate and ContentTemplate property. if we use Accordion
DataSource property then we must need to call the DataBind method.


Accordion control also have many useful properties such as SelectedIndex, HeaderCssClass, HeaderSelectedCssClass, ContentCssClass,
FadeTransitions, TransitionDuration, FramesPerSecond, RequireOpenedPane, SupressHeaderPostbacks, Panes, HeaderTemplate, ContentTemplate etc.


Accordion SelectedIndex property indicate the AccordionPane that is initially visible.


HeaderCssClass, HeaderSelectedCssClass, ContentCssClass properties are used to change the default look and feel of Accordion and AccordionPane
controls.


FadeTransition, TransitionDuration and FramesPerSecond properties allow us to configure Accordion fading transition effect.

RequireOpenedPane property ensure that one pane is always open (visible) in Accordion control. SupressHeaderPostbacks property prevent
client side click handlers for pane header elements such as a hyperlink in header. Panes property provide a collection of AccordionPane
controls in Accordion.


HeaderTemplate contains the markup which is used for a pane's header when databinding and ContentTemplate contains the markup for pane's content
when databinding.


UsingAccordion.aspx


<%@ Page Language="C#" AutoEventWireup="true" %>

<%@ Register Assembly="AjaxControlToolkit" Namespace="AjaxControlToolkit" TagPrefix="cc1" %>

<!DOCTYPE html>

<script runat="server">

</script>

<html xmlns="http://www.w3.org/1999/xhtml" >
<head id="Head1" runat="server">
<title>How to use Accordion in asp.net ajax</title>
<style type="text/css">
.HeaderCSS
{
color:Snow;
background-color:Crimson;
font-size:medium;
border:solid 1px salmon;
font-weight:bold;
}
.HeaderSelectedCSS
{
color:Snow;
background-color:OrangeRed;
font-weight:bold;
font-style:italic;
}
</style>
</head>
<body>
<form id="form1" runat="server">
<div>
<h2 style="color:DarkSeaGreen; font-style:italic;">Ajax Control Toolkit Example: Using Accordion</h2>
<hr width="450" align="left" color="DarkSeaGreen" />
<asp:ScriptManager
ID="ScriptManager1"
runat="server"
>
</asp:ScriptManager>
<cc1:Accordion
runat="server"
ID="Accordion1"
HeaderCssClass="HeaderCSS"
HeaderSelectedCssClass="HeaderSelectedCSS"
Width="500"
BorderColor="Orange"
BorderWidth="2"
>
<Panes>
<cc1:AccordionPane runat="server" ID="AccordionPane1">
<Header>Red Orchid</Header>
<Content>
<asp:Image ID="Image1" runat="server" ImageUrl="~/Images/RedOrchid.jpg" Width="200" />
</Content>
</cc1:AccordionPane>
<cc1:AccordionPane runat="server" ID="AccordionPane2">
<Header>Green Orchid</Header>
<Content>
<asp:Image ID="Image2" runat="server" ImageUrl="~/Images/GreenOrchid.jpg" />
</Content>
</cc1:AccordionPane>
<cc1:AccordionPane runat="server" ID="AccordionPane3">
<Header>Blue Orchid</Header>
<Content>
<asp:Image ID="Image3" runat="server" ImageUrl="~/Images/BlueOrchid.jpg" />
</Content>
</cc1:AccordionPane>
</Panes>
</cc1:Accordion>
</div>
</form>
</body>
</html>