Submit a page to another page in asp.net
The Button is an ASP.NET web server control. By default, a Button
control is a submit Button, and by clicking the submit Button the ASP.NET page
submits the page back to itself.
Sometimes ASP.NET developers want to post one page to another page. This is useful for creating multi-page forms. We can configure the Button control to post the current page to another page. This is called cross-page posting. We can also use Wizard server control to create multi-view forms. We can configure cross-page posting for individual Buttons, so we can create a page that posts to different pages depending on which Button the user clicks.
The Button control's PostBackUrl property gets or sets the URL of the page to post from the current page when the Button control is clicked. By default, this property value is an empty string that causes the page to post back to the same page. We need to set the target page URL as this property value when we want to cross-page posting.
We can get the information from the source page on the target page. The Page class has a property named PreviousPage. We can use the reference of the PreviousPage property to search the controls on the source page and extract their values. We can use here the FindControl() method.
The FindControl(String) method searches the naming container for a server control with the specified identifier. In this method, the String type parameter specifies the identifier for the control to be found such as a control's ID property value.
The following ASP.NET C# example code demonstrates to us how can we submit a web page to another page in an ASP.NET application.
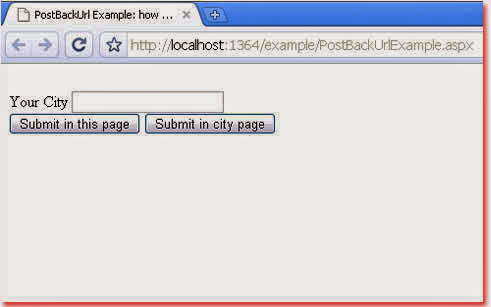
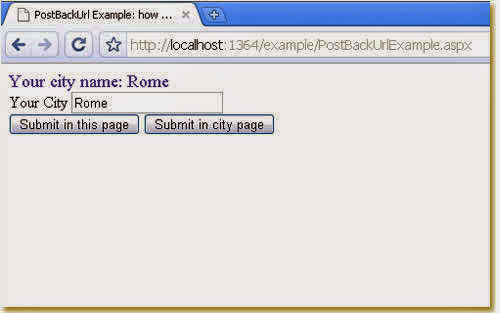
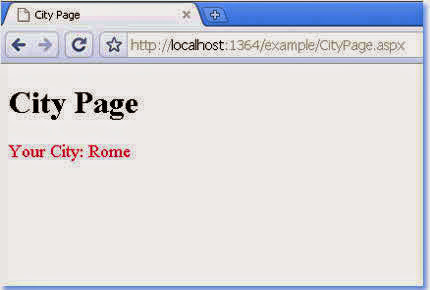
In this example, at first, we created a web form name PostBackUrlExample.aspx and then we added two Label controls, two Button controls, and a RequiredFieldValidator control. In the first Button, we use a simple Click event which submits the page itself. In another Button, we use the PostBackUrl property to submit the page to another page named CityPage.aspx. When the user inputs a city name and clicks the second Button, the page submits to another page and the user can see inputted city name on the target page.
Sometimes ASP.NET developers want to post one page to another page. This is useful for creating multi-page forms. We can configure the Button control to post the current page to another page. This is called cross-page posting. We can also use Wizard server control to create multi-view forms. We can configure cross-page posting for individual Buttons, so we can create a page that posts to different pages depending on which Button the user clicks.
The Button control's PostBackUrl property gets or sets the URL of the page to post from the current page when the Button control is clicked. By default, this property value is an empty string that causes the page to post back to the same page. We need to set the target page URL as this property value when we want to cross-page posting.
We can get the information from the source page on the target page. The Page class has a property named PreviousPage. We can use the reference of the PreviousPage property to search the controls on the source page and extract their values. We can use here the FindControl() method.
The FindControl(String) method searches the naming container for a server control with the specified identifier. In this method, the String type parameter specifies the identifier for the control to be found such as a control's ID property value.
The following ASP.NET C# example code demonstrates to us how can we submit a web page to another page in an ASP.NET application.
In this example, at first, we created a web form name PostBackUrlExample.aspx and then we added two Label controls, two Button controls, and a RequiredFieldValidator control. In the first Button, we use a simple Click event which submits the page itself. In another Button, we use the PostBackUrl property to submit the page to another page named CityPage.aspx. When the user inputs a city name and clicks the second Button, the page submits to another page and the user can see inputted city name on the target page.
PostBackUrlExample.aspx
<%@ Page Language="C#" %>

<!DOCTYPE html>

<script runat="server">
    protected void Button1_Click(object sender, System.EventArgs e) {
        Label1.Text = "Your city name: " +
            TextBox1.Text.ToString();
    }
</script>

<html xmlns="http://www.w3.org/1999/xhtml">
<head runat="server">
    <title>PostBackUrl Example: how to submit a page to another page in asp.net</title>
</head>
<body>
    <form id="form1" runat="server">
    <div>
        <asp:Label ID="Label1" runat="server" Font-Size="Large" ForeColor="DarkSlateBlue"></asp:Label>
        <br />
        <asp:Label ID="Label2" runat="server" Text="Your City" AssociatedControlID="TextBox1"></asp:Label>
        <asp:TextBox ID="TextBox1" runat="server"></asp:TextBox>
        <asp:RequiredFieldValidator ID="RequiredFieldValidator1" runat="server" ControlToValidate="TextBox1" Text="*"></asp:RequiredFieldValidator>
        <br />
        <asp:Button ID="Button1" runat="server" Text="Submit in this page" OnClick="Button1_Click" />
        <asp:Button ID="Button2" runat="server" Text="Submit in city page" PostBackUrl="~/CityPage.aspx" />
    </div>
    </form>
</body>
</html>
CityPage.aspx
<%@ Page Language="C#" %>

<!DOCTYPE html>

<script runat="server">
    protected void Page_Load(object sender, System.EventArgs e) {
        TextBox PP_TextBox1;
        PP_TextBox1 = (TextBox)PreviousPage.FindControl("TextBox1");
        Label1.Text = "Your City: " +
            PP_TextBox1.Text;
    }
</script>

<html xmlns="http://www.w3.org/1999/xhtml">
<head runat="server">
    <title>City Page</title>
</head>
<body>
    <form id="form1" runat="server">
    <div>
        <h1>City Page</h1>
        <asp:Label ID="Label1" runat="server" Font-Size="Large" ForeColor="Crimson"></asp:Label>
    </div>
    </form>
</body>
</html>