UWP - Exit an app
The following Universal Windows Platform application development
tutorial demonstrates how we can exit from an app.
In this UWP tutorial, we will call the CoreApplication class Exit() method to exit the app. We also get the current application object and call its Exit() method to exit the app.
The CoreApplication class enables apps to handle state changes, manage windows, and integrate with a variety of UI frameworks. The CoreApplication class Exit() method shuts down the app.
The Application class encapsulates a Windows Presentation Foundation application. The Application implements the singleton pattern to provide shared access to its window, property, and resource scope services. Consequently, only one instance of the Application class can be created per AppDomain.
The Application class Current property gets the Application object for the current AppDomain. This property value is the Application object for the current AppDomain. Here we will call the Exit() method to exit the current application.
MainPage.xaml
<Page
x:Class="UniversalAppTutorials.MainPage"
xmlns="http://schemas.microsoft.com/winfx/2006/xaml/presentation"
xmlns:x="http://schemas.microsoft.com/winfx/2006/xaml"
xmlns:local="using:UniversalAppTutorials"
xmlns:d="http://schemas.microsoft.com/expression/blend/2008"
xmlns:mc="http://schemas.openxmlformats.org/markup-compatibility/2006"
mc:Ignorable="d"
>
<StackPanel Padding="50" Orientation="Vertical" Background="AliceBlue">
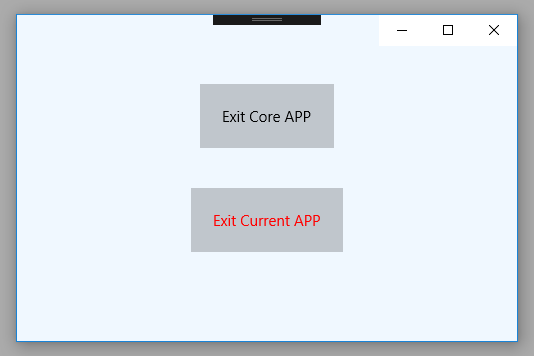
<Button
x:Name="Button1"
Content="Exit Core APP"
HorizontalAlignment="Center"
Click="Button1_Click"
Foreground="Black"
Margin="20"
Padding="20"
/>
<Button
x:Name="Button2"
Content="Exit Current APP"
HorizontalAlignment="Center"
Click="Button2_Click"
Foreground="Red"
Margin="20"
Padding="20"
/>
</StackPanel>
</Page>
MainPage.xaml.cs
using Windows.UI.Xaml.Controls;
using Windows.UI.Xaml;
using Windows.ApplicationModel.Core;


namespace UniversalAppTutorials
{
    public sealed partial class MainPage : Page
    {
        public MainPage()
        {
            this.InitializeComponent();
        }

        /*
            CoreApplication
                Enables apps to handle state changes, manage windows,
                and integrate with a variety of UI frameworks.

            CoreApplication.Exit
                Shuts down the app.

            Application
                Encapsulates the app and its available services.

            Application.Current
                Gets the Application object for the current application.

            Application.Exit
                Shuts down the app.
        */

        private void Button1_Click(object sender, RoutedEventArgs e)
        {
            // Exit the application
            CoreApplication.Exit();
        }

        private void Button2_Click(object sender, RoutedEventArgs e)
        {
            // Another way to exit the application
            Application.Current.Exit();
        }
    }
}