Add custom text in Calendar Individual Day Cell
Calendar is an ASP.NET web server control. Users can select an
individual date or date range in a Calendar control. Calendar OnDayRender()
method raises the DayRender event of calendar control that allows us to write
a custom handler for the DayRender event. The Calendar DayRender event occurs
when each day is created in the control hierarchy for the Calendar control.
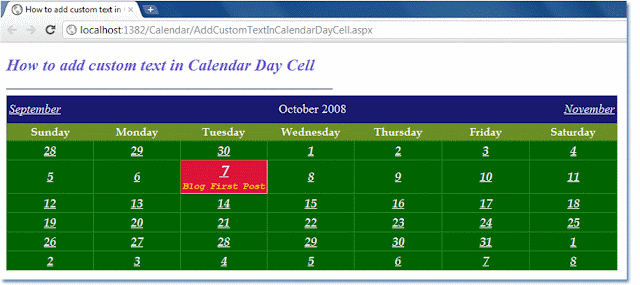
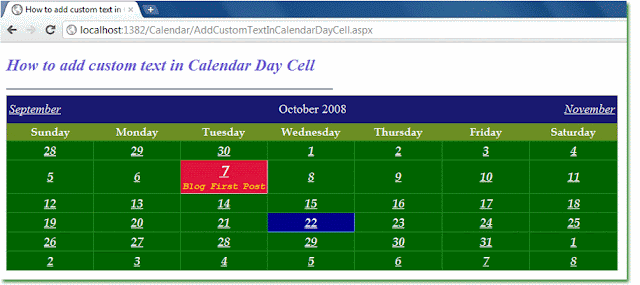
We can add static control to a calendar’s specific date cell before Calendar display in a web browser such as Literal, Image, and Hyperlink control. ASP.NET Literal server control reserves a location on the web page to display static text. So if we can add a Literal control on the Calendar individual date cell then we can add any static text to any date cell in the Calendar control.
First, we need to create a Literal control programmatically in the DayRender event handler section. Then we add static text to Literal control which we want to display in the calendar’s specific date cell. After creating the Literal control we add it to the individual date cell. Finally, calendar control displays the static text on the specified date cell. We add the newly created Literal control to Calendar’s specific date cell control collection.
The following ASP.NET C# example code demonstrates to us how can we add custom text on the Calendar individual date cell in an ASP.NET application.
AddCustomTextInCalendarDayCell.aspx
<%@ Page Language="C#" AutoEventWireup="true" %>

<!DOCTYPE html>

<script runat="server">
    protected void Calendar1_DayRender(object sender, DayRenderEventArgs e)
    {
        if (e.Day.Date == new DateTime(2008,10,7))
        {
            Literal Literal1 = new Literal();
            Literal1.Text ="<br /><font size=-1 color=Gold>Blog First Post</font>";

            e.Cell.Font.Italic = true;
            e.Cell.Font.Size = FontUnit.XLarge;
            e.Cell.BackColor = System.Drawing.Color.Crimson;
            e.Cell.BorderColor = System.Drawing.Color.Pink;
            e.Cell.ForeColor = System.Drawing.Color.Snow;
            e.Cell.Font.Name = "Courier New";

            e.Cell.Controls.AddAt(1,Literal1);
        }
    }
</script>

<html xmlns="http://www.w3.org/1999/xhtml">
<head id="Head1" runat="server">
    <title>How to add custom text in Calendar Day Cell</title>
</head>
<body>
    <form id="form1" runat="server">
    <div>
        <h2 style="color:SlateBlue; font-style:italic;">
            How to add custom text in Calendar Day Cell
        </h2>
        <hr width="475" align="left" color="SlateGray" />
        <asp:Calendar
            ID="Calendar1"
            runat="server"
            NextPrevFormat="FullMonth"
            ForeColor="WhiteSmoke"
            SelectionMode="Day"
            DayNameFormat="Full"
            Font-Names="Book Antiqua"
            Font-Size="Medium"
            OnDayRender="Calendar1_DayRender"
            VisibleDate="10/7/2008"
            >
            <DayHeaderStyle
                 BackColor="OliveDrab"
                 />
            <DayStyle
                 BackColor="DarkGreen"
                 BorderColor="ForestGreen"
                 BorderWidth="1"
                 Font-Bold="true"
                 Font-Italic="true"
                 Font-Size="Large"
                 />
            <NextPrevStyle
                 Font-Italic="true"
                 Font-Names="Arial CE"
                 />
            <SelectedDayStyle
                 BackColor="DarkBlue"
                 BorderColor="CornflowerBlue"
                 />
            <TitleStyle
                 BackColor="MidnightBlue"
                 Height="36"
                 Font-Size="Large"
                 Font-Names="Courier New Baltic"
                 />
        </asp:Calendar>
    </div>
    </form>
</body>
</html>