How to use RowDataBound event in GridView

GridView RowDataBound Event
GridView is an asp.net server control. GridView displays the values of a data source in a table. in a GridView each column represents a field and each row represents a record from the data source. GridView server control allows us to select, sort, and edit data.

GridView RowDataBound event occurs when a data row is bound to data in a GridView server control. Each row in the GridView must be bound to record in the data source before GridView control renders. RowDataBound event provides an event-handling method that performs a custom routine. Asp.net developers can modify the values of the specific row when this event occurs. We also can format specific rows in GridView using this event.

GridViewRow object represents an individual row in GridView server control. GridViewRow.RowType property gets the row type of the GridViewRow object. RowType property can determine the type of row that the GridViewRow object represents. The different row types are DataRow, Footer, Header, EmptyDataRow, Pager, and Separator.

A GridViewRowEventArgs object is passed to the event handling method. This object allows us to access the properties of the row being bound. We can access a specific Cell in the row and can access a specific row in the GridView. We can also determine which row type is being bound such as header row, data row, or footer row.

RowDataBound property provides a way to asp.net developers to edit, format, or design a specific cell or row in GridView control when row data is bound. We also can format specific rows or cells in GridView by predefined conditions. Such as we can apply bold text for cells or rows whose specific field's value is greater than or lower than a specified number, or we can apply a different row color which a specified cell value in a range, etc.
GridViewFormattingSpecificRow.aspx

<%@ Page Language="C#" %>

<!DOCTYPE html>

<script runat="server">
    protected void GridView1_RowDataBound(object sender, GridViewRowEventArgs e) { 
        if(e.Row.RowType == DataControlRowType.DataRow)
        {
            Decimal ProductPrice = (decimal)DataBinder.Eval(e.Row.DataItem, "UnitPrice");
            if(ProductPrice<20)
            {
                e.Row.ForeColor = System.Drawing.Color.Crimson;
                e.Row.Font.Italic = true;
                e.Row.BackColor = System.Drawing.Color.LightPink;
            }
        }
    }
</script>

<html xmlns="http://www.w3.org/1999/xhtml">
<head id="Head1" runat="server">
    <title>asp.net GridView RowDataBound Event example: how to format specific row</title>
</head>
<body>
    <form id="form1" runat="server">
    <div>
        <h2 style="color:Navy">GridView OnRowDataBound Example</h2>
        <asp:SqlDataSource 
            ID="SqlDataSource1"
            runat="server"
            ConnectionString="<%$ ConnectionStrings:NorthwindConnectionString %>"
            SelectCommand="SELECT ProductID, ProductName, UnitPrice FROM Products"
            >
        </asp:SqlDataSource>
        <asp:GridView 
            ID="GridView1"
            runat="server"
            DataSourceID="SqlDataSource1"
            ForeColor="AliceBlue"
            BackColor="DarkSalmon"
            BorderColor="Salmon"
            HeaderStyle-BackColor="Crimson"
            AllowPaging="true"
            AutoGenerateColumns="true"
            DataKeyNames="ProductID"
            OnRowDataBound="GridView1_RowDataBound"
            >
        </asp:GridView>        
    </div>
    </form>
</body>
</html>

How to use CommandField in GridView

GridView CommandField
GridView is an ASP.NET web server control. Developers can manually specify which field appears in GridView by setting the AutoGenerateColumns property value to False. They can define their own column field collection and column field types. GridView supports different column field types, these are BoundField, ButtonField, CheckBoxField, CommandField, HyperLinkField, ImageField, and TemplateField.

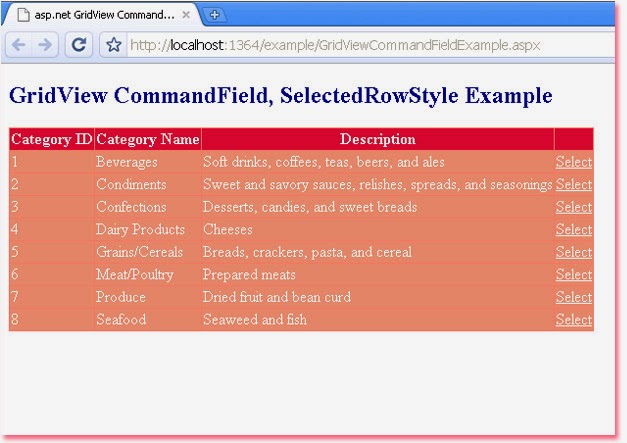
CommandField represents a special field that displays command buttons to perform selecting, editing, or deleting operations in GridView. GridView server control displays a CommandField as a column.

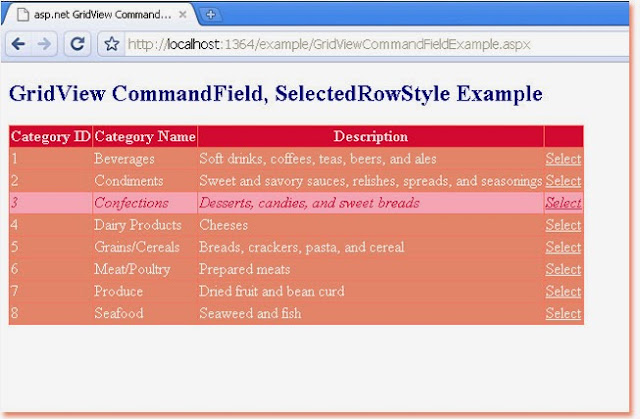
CommandField's ShowSelectButton property allows us to show or hide a Select button in a CommandField field for each record in GridView. This Select button allows us to select a record in the GridView server control.

ShowEditButton property provides a way to show or hide an Edit button in a CommandField field for each record in GridView. This Edit button allows us to edit a record from the data source. If we click an Edit button for a specific record, the edit button is replaced with an Update button and a Cancel button, all other Command buttons are also hidden.

ShowDeleteButton property allows us to show or hide a Delete button in a CommandField field for each record in GridView. this Delete button allows us to delete a record from the data source.

SelectImageUrl, EditImageUrl, DeleteImageUrl, UpdateImageUrl, and CancelImageUrl properties allow us to display the image as a button instead Select, Edit, Delete, Update, and Cancel default button. To apply an image button instead default command button we also need to set the ByttonType property value to Image.

Developers can change the default command button text by setting the following properties those are SelectText, EditText, DeleteText, CancelText, and UpdateText property.

The following ASP.NET C# example code demonstrates to us how can we use CommandField in GridView server control.
GridViewCommandFieldExample.aspx

<%@ Page Language="C#" %>

<!DOCTYPE html>

<script runat="server">

</script>

<html xmlns="http://www.w3.org/1999/xhtml">
<head id="Head1" runat="server">
    <title>asp.net GridView CommandField, SelectedRowStyle example: how to use CommandField</title>
</head>
<body>
    <form id="form1" runat="server">
    <div>
        <h2 style="color:Navy">GridView CommandField, SelectedRowStyle Example</h2>
        <asp:SqlDataSource 
            ID="SqlDataSource1"
            runat="server"
            ConnectionString="<%$ ConnectionStrings:NorthwindConnectionString %>"
            SelectCommand="SELECT CategoryID, CategoryName, Description FROM Categories"
            >
        </asp:SqlDataSource>
        <asp:GridView 
            ID="GridView1"
            runat="server"
            DataSourceID="SqlDataSource1"
            ForeColor="AliceBlue"
            BackColor="DarkSalmon"
            BorderColor="Salmon"
            HeaderStyle-BackColor="Crimson"
            AllowPaging="true"
            AutoGenerateColumns="false"
            DataKeyNames="CategoryID"
            AutoGenerateSelectButton="false"
            >
            <Columns>
                <asp:BoundField HeaderText="Category ID" DataField="CategoryID" />
                <asp:BoundField HeaderText="Category Name" DataField="CategoryName" />
                <asp:BoundField HeaderText="Description" DataField="Description" />
                <asp:CommandField ShowSelectButton="true" ButtonType="Link" SelectText="Select" />
            </Columns>
            <SelectedRowStyle BackColor="LightPink" Font-Italic="true" ForeColor="Crimson" />
        </asp:GridView>        
    </div>
    </form>
</body>
</html>

How to use HyperLinkField in GridView

GridView HyperLinkField
GridView server control allows us to display data source values in a table where each column represents a field and each row represents a record of the data source.

GridView AutoGenerateColumns property accepts a Boolean value. If we set this property value to True then GridView creates an AutoGenerateField object for each field in the data source. If we set this property value to False then we need to specify manually which column fields appear in GridView. We also need to specify the column filed types such as BoundField, ButtonField, CheckBoxField, HyperLinkField, etc.

HyperLinkField displays a field value in a data source as a hyperlink. HyperLinkField enables us to bind a second field to the hyperlink's URL. GridView server control displays the HyperLinkField object as a column.

HyperLinkField Text property allows us to display a caption. NavigateUrl property specifies the URL to navigate to when a hyperlink is clicked. Target property set the target window or frame in which to display the linked content.

HyperLinkField Text and NavigateUrl property share the same caption and navigation URL for all hyperlinks in a GridView. Target property value also applies the same target to all hyperlinks in a GridView.

Alternatively, ASP.NET developers can bind the HyperLinkField object to fields in a data source. This way we can display different captions for each hyperlink and set different navigate URLs for each hyperlink in the HyperLinkField object.

HyperLinkField object's DataTextField property allows us to bind a field to a caption. DataNavigateUrlFields property set a comma-separated list of fields to use to create the navigation URL.

ASP.NET developers can specify a custom format for the hyperlinks captions and navigate URLs in the GridView. DataTextFormatString and DataNavigateUrlFormatString properties allow us to do this.

We can hide hyperlinks from GridView by setting the HyperLinkField Visible property. The HeaderText property allows us to show a caption in the header section of GridView and the HeaderImageUrl property allows us to display an image in the header section.

The following ASP.NET C# example code demonstrates to us how can we use HyperLinkField in GridView server control.
GridViewHyperLinkFieldExample.aspx

<%@ Page Language="C#" %>

<!DOCTYPE html>

<script runat="server">

</script>

<html xmlns="http://www.w3.org/1999/xhtml">
<head id="Head1" runat="server">
    <title>asp.net asp:HyperLinkField example: how to use HyperLinkField in GridView</title>
</head>
<body>
    <form id="form1" runat="server">
    <div>
        <h2 style="color:Red">GridView HyperLinkField Example</h2>
        <asp:Label ID="Label1" runat="server" Font-Italic="true" ForeColor="Red"></asp:Label>
        <asp:SqlDataSource 
            ID="SqlDataSource1"
            runat="server"
            ConnectionString="<%$ ConnectionStrings:NorthwindConnectionString %>"
            SelectCommand="SELECT CategoryID, CategoryName, Description FROM Categories"
            >
        </asp:SqlDataSource>
        <asp:GridView 
            ID="GridView1"
            runat="server"
            DataSourceID="SqlDataSource1"
            AllowPaging="true"
            ForeColor="AliceBlue"
            BackColor="DodgerBlue"
            BorderColor="LightSkyBlue"
            AutoGenerateColumns="false"
            HeaderStyle-BackColor="DarkBlue"
            >
            <Columns>
                <asp:BoundField HeaderText="Category ID" DataField="CategoryID" />
                <asp:HyperLinkField 
                    HeaderText="Category Name"
                    DataNavigateUrlFields="CategoryID"
                    DataNavigateUrlFormatString="~/CategoryDetails.aspx?CategoryID={0}"
                    DataTextField="CategoryName"
                    />
                <asp:BoundField HeaderText="Description" DataField="Description" />
            </Columns>
        </asp:GridView>        
    </div>
    </form>
</body>
</html>
CategoryDetails.aspx

<%@ Page Language="C#" %><!DOCTYPE html><script runat="server"></script><html xmlns="http://www.w3.org/1999/xhtml"><head runat="server">    <title>Category Details Page</title></head><body>    <form id="form1" runat="server">    <div>        <h2 style="color:Red">Category Details</h2>        <asp:SqlDataSource             ID="SqlDataSource1"            runat="server"            ConnectionString="<%$ ConnectionStrings:NorthwindConnectionString %>"            SelectCommand="SELECT ProductID, ProductName, UnitPrice FROM Products WHERE CategoryID=@CategoryID"            >            <SelectParameters>                <asp:QueryStringParameter                     Name="CategoryID"                     QueryStringField="CategoryID"                      />            </SelectParameters>        </asp:SqlDataSource>        <asp:DetailsView             ID="DetailsView1"            runat="server"            DataSourceID="SqlDataSource1"            AllowPaging="true"            ForeColor="AliceBlue"            BackColor="DodgerBlue"            BorderColor="LightSkyBlue"            >        </asp:DetailsView>            </div>    </form></body></html>

How to use CheckBoxField in GridView

GridView CheckBoxField
GridView is an ASP.NET server control. GridView allows us to display data source values in a table. Within a GridView control, each column represents a field and each row represents a record of the data source.

GridView AutoGenerateColumns property allows us to create an AutoGenerateField object for each field in the data source. if we set the AutoGenerateColumns property value to True then each field is rendered as a column in GridView in the order that each field appears in the data source.

asp.net developers can manually specify which column fields appear in GridView by setting the AutoGenerateColumns property value to False. if the GridView AutoGenerateColumns property value is false, we can define our own column field collection and column filed types.

each column in a GridView is represented by a DataControlField object. data control fields are used by GridView to represent a field of data. Different types of data control fields are BoundField, ButtonField, CheckBoxField, CommandField, HyperLinkField, ImageField, and TemplateField.

CheckBoxField column field type is commonly used to display fields with a Boolean value because a Boolean has only two states True and False. CheckBoxFiled displays a checkbox for each item in the GridView server control. GridView control displays a CheckBoxFiled object as a column.

A checkbox is normally disabled (read-only) in GridView. But the check box is enabled in GridView's edit mode. We can specify the data source field to display as CheckBoxFiled in GridView by setting the CheckBoxField's DataField property.

CheckBoxFiled's Text property allows us to display a caption next to each checkbox in GridView. We can hide checkboxes from GridView by setting the CheckBoxField's Visible property. Developers also can hide the CheckBox from GridView in its insert mode by setting CheckBoxFiled's InsertVisible property.

Developers can display a caption in the CheckBoxFiled header section by setting the HeaderText property. HeaderImageURl property allows us to show an image in the CheckBoxFiled header.

The following ASP.NET C# example code demonstrates to us how can we use CheckBoxFiled in GridView server control.
GridViewCheckBoxFieldExample.aspx

<%@ Page Language="C#" %>

<!DOCTYPE html>

<script runat="server">

</script>

<html xmlns="http://www.w3.org/1999/xhtml">
<head id="Head1" runat="server">
    <title>asp.net GridView CheckBoxField example: how to use asp:CheckBoxField</title>
</head>
<body>
    <form id="form1" runat="server">
    <div>
        <h2 style="color:Navy">GridView CheckBoxField Example</h2>
        <asp:Label ID="Label1" runat="server" Font-Italic="true" ForeColor="Red"></asp:Label>
        <asp:SqlDataSource 
            ID="SqlDataSource1"
            runat="server"
            ConnectionString="<%$ ConnectionStrings:NorthwindConnectionString %>"
            SelectCommand="SELECT ProductID, ProductName, UnitPrice, Discontinued FROM Products"
            >
        </asp:SqlDataSource>
        <asp:GridView 
            ID="GridView1"
            runat="server"
            DataSourceID="SqlDataSource1"
            AllowPaging="true"
            ForeColor="AliceBlue"
            BackColor="DodgerBlue"
            BorderColor="LightSkyBlue"
            HeaderStyle-BackColor="DarkBlue"
            AutoGenerateColumns="false"
            >
            <Columns>
                <asp:BoundField HeaderText="Product ID" DataField="ProductID" />
                <asp:BoundField HeaderText="Product Name" DataField="ProductName" />
                <asp:BoundField HeaderText="Unit Price" DataField="UnitPrice" />
                <asp:CheckBoxField HeaderText="Discontinued" DataField="Discontinued" />
            </Columns>
        </asp:GridView>        
    </div>
    </form>
</body>
</html>
How to use SqlConnection in asp.net c#


SqlConnection


SqlConnection represents an open connection to a SQL Server database. this object represents a unique session to a SQL server data source. It works with client/server database systems such as Microsoft SQL Server database. SqlConnection is used together with SqlDataAdapter and SqlCommand object.


SqlDataAdapter represents a set of data commands and a database connection that are used to fill the DataSet and update a SQL server database. SqlCommand represents a Transact-SQL-Statement or stored procedure to execute against a SQL server database.


We can create a SqlConnection instance by following constructors SqlConnection(), SqlConnection(String), and SqlConnection(String, SqlCredential). SqlConnection() initializes a new instance of SqlConnection class and SqlConnection(String) requires a string that contains the connection string to initialize a new SqlConnection instance.


SqlConnection ConnectionString property gets or sets the string used to open a database. ConnectionTimeout, Database, and Credential are also important properties.


There are many useful methods that exist in SqlConnection class such as BeginTransaction(), ClearPool, Close, Open, CreateCommand, Dispose(), etc.


We need to close the SQL server database connection by calling SqlConnection Close or Dispose. If we want to ensure that the connection is always closed we need to open the connection inside of a using block.


The following C# example ado.net code section describes more about SqlConnection.


SqlConnectionExample.aspx


<%@ Page Language="C#" %>
<%@ Import Namespace="System.Data" %>
<%@ Import Namespace="System.Data.SqlClient" %>
<%@ Import Namespace="System.Configuration" %>

<!DOCTYPE html>

<script runat="server">
protected void Page_Load(object sender, System.EventArgs e) {
if(!Page.IsPostBack){
SqlConnection myConnection;
SqlCommand myCommand;
SqlDataAdapter myAdapter;
DataTable myTable;

myConnection = new SqlConnection();
myConnection.ConnectionString = ConfigurationManager.ConnectionStrings["NorthwindConnectionString"].ConnectionString;

myCommand = new SqlCommand();
myCommand.CommandText = "SELECT CategoryID, CategoryName, Description FROM Categories";
myCommand.CommandType = CommandType.Text;
myCommand.Connection = myConnection;

myTable = new DataTable();
myAdapter = new SqlDataAdapter();
myAdapter.SelectCommand = myCommand;
myAdapter.Fill(myTable);

GridView1.DataSource = myTable.DefaultView;
GridView1.DataBind();

myAdapter.Dispose();
myCommand.Dispose();
myConnection.Dispose();
}
}
</script>

<html xmlns="http://www.w3.org/1999/xhtml">
<head runat="server">
<title>asp.net SqlConnection example: how to use SqlConnection</title>
</head>
<body>
<form id="form1" runat="server">
<h2 style="color:Red;">SqlConnection Example</h2>
<div>
<asp:GridView
ID="GridView1"
runat="server"
BackColor="AliceBlue"
ForeColor="HotPink"
HeaderStyle-BackColor="HotPink"
HeaderStyle-ForeColor="AntiqueWhite"
BorderColor="LightPink"
GridLines="Horizontal"
Font-Italic="true"
>
</asp:GridView>
</div>
</form>
</body>
</html>


How to use SqlCommand in asp.net c#


SqlCommand


SqlCommand represents a Transact-SQL-Statement or stored procedure to execute against a SQL Server Database. To create a new instance of SqlCommand instance you can use any one of these constructors SqlCommand(), SqlCommand(String), SqlCommand(String, SqlConnection), or SqlCommand(String, SqlConnection, SqlTransaction). SqlCommand() initializes a new instance of the SqlCommand class. SqlCommand(String) constructor requires an extra text of the query. SqlCommand(String, SqlConnection) constructor requires query text and a SqlConnection. SqlCommand(String, SqlConnection, SqlTransaction) needs query text, a SqlConnection, and SqlTransaction.


The SqlCommand class has many useful properties such as CommandText, CommandTimeout, CommandType, Connection, Notification, Parameters, Transaction, UpdatedRowSource, etc. CommandText gets or set Transact-SQL-Statement, table name, or stored procedure to execute at the data source. CommandType property gets or sets a value that indicates how the CommandText property is to be interpreted. Connection property gets or sets SqlConnection. The Parameters property gets the SqlParameterCollection. Transaction property gets or sets the SqlTransaction.


Many methods exist in SqlCommand class such as BeginExecuteNonQuery(), BeginExecuteReader(), BeginExecuteXmlReader(), Cancel, Clone, CreateParameter, Dispose(), EndExecuteNonQuery, EndExecuteXmlReader, ExecuteNonQuery, ExecuteNonQueryAsync(), ExecuteReader(), ExecuteReaderAsync(), ExecuteScaler, ExecuteXmlReader, GetType, ResetCommandTimeout, ToString, etc.


ExecuteReader() method sends the CommandText to the connection and builds a SqlDataReader. ExecuteReader(CommandBehavior) method builds a SqlDataReader using one of the CommandBehavior values (such as CloseConnection, Default, SingleResult, SingleRow, etc).


ExecuteNonQuery method executes a Transact-SQL-Statement and returns the number of rows affected. ExecuteXmlReader method builds an XmlReader object. ExecuteReader() method sends the Commandtext to the Connection and builds a SqlDataReader object. The ExecuteScaler method executes the query and returns the first column of the first row in the result set.


SqlCommand Disposed event occurs when the component is disposed of by Dispose method.


The following example code describes more about SqlCommand in the asp.net environment.


SqlCommandExample.aspx


<%@ Page Language="C#" %>
<%@ Import Namespace="System.Data" %>
<%@ Import Namespace="System.Data.SqlClient" %>
<%@ Import Namespace="System.Configuration" %>

<!DOCTYPE html>

<script runat="server">
protected void Page_Load(object sender, System.EventArgs e) {
if(!Page.IsPostBack){
SqlConnection mySqlConnection;
SqlCommand mySqlCommand;
SqlDataReader mySqlDataReader;

mySqlConnection = new SqlConnection();
mySqlConnection.ConnectionString = ConfigurationManager.ConnectionStrings["NorthwindConnectionString"].ConnectionString;

mySqlCommand = new SqlCommand();
mySqlCommand.CommandText = "SELECT TOP 8 ProductID, ProductName, UnitPrice FROM Products";
mySqlCommand.CommandType = CommandType.Text;
mySqlCommand.Connection = mySqlConnection;

mySqlCommand.Connection.Open();
mySqlDataReader = mySqlCommand.ExecuteReader(CommandBehavior.CloseConnection);

GridView1.DataSource = mySqlDataReader;
GridView1.DataBind();

mySqlCommand.Dispose();
mySqlConnection.Dispose();
}
}
</script>

<html xmlns="http://www.w3.org/1999/xhtml">
<head runat="server">
<title>asp.net SqlCommand example: how to use SqlCommand</title>
</head>
<body>
<form id="form1" runat="server">
<asp:Label ID="Label1" runat="server" Font-Size="X-Large" Font-Bold="true" ForeColor="Teal">
SqlCommand Example
</asp:Label>
<br /><br />
<div>
<asp:GridView
ID="GridView1"
runat="server"
BackColor="HotPink"
ForeColor="WhiteSmoke"
HeaderStyle-BackColor="DarkOrange"
BorderColor="Orange"
>
</asp:GridView>
</div>
</form>
</body>
</html>


How to use DetailsView in asp.net

DetailsView Web Server Control
DetailsView is an asp.net web server control. DetailsView displays a single record from a data source. DetailsView provides a way to show, edit, update, insert, or delete a single record at a time. This control displays each field of a record on its own line. Sometimes .net developers use DetailsView in a master detail page.

Typically this control is used for updating and inserting records. DetailsView updating, inserting, and deleting records tasks depend on the data source control capabilities. DetailsView does not support sorting. This control supports paging. DetailsView creates a user interface for paging if we set the AllowPaging property value to true.

The .net developers can populate a DetailsView with data using many data sources control such as SqlDataSource, LinqDataSource, and ObjectDataSource control. DetailsView provides a UI that allows users to update a bound record. An editable view displays an additional row that contains Edit, Insert, and Delete command buttons.

After clicking a command button DetailsView redisplays the row with controls that allow users to modify the row contents. DetailsView display data automatically when AutoGenerateRows property value is set to true. DetailsView control uses textboxes to display data in a BoundField. DetailsView renders CheckBox to display Boolean data. Developers can customize input control displayed in edit mode by using a TemplateField.

The DetailsView inserts data by passing the values to be inserted in the data source using Values dictionary collection.

DetailsView PagerSettings property allows us to customize the appearance of the paging user interface. The Pager supports display modes. We can control it with the PagerSettings Mode property. Possible modes are NextPrevious, NextPreviousFirstLast, Numeric, and NumericFirstLast.

We can enable DetailsView built-in edit, insert and delete functionality by setting AutoGenerateEditButton, AutoGenerateInsertButton, and AutoGenerateDeleteButton properties values to true.

TemplateField enables developers to specify templates that contain markup and controls to customize the layout of a row in DetailsView. We can use ItemTemplate, InsertItemTemplate, and EditItemTemplate to customize the data insert and edit interface. In a template, we can bind controls to data using Eval and Bind methods.

The following c# example source code demonstrates to us how can we use DetailsView server control in the asp.net environment.
DetailsViewExample.aspx

<%@ Page Language="C#" %>

<!DOCTYPE html>

<script runat="server">

</script>

<html xmlns="http://www.w3.org/1999/xhtml">
<head runat="server">
    <title>asp.net DetailsView example: how to use DetailsView</title>
</head>
<body>
    <form id="form1" runat="server">
    <div>
        <h2 style="color:Navy">DetailsView Example</h2>
        <asp:SqlDataSource ID="SqlDataSource1" runat="server" ConnectionString="<%$ ConnectionStrings:NorthwindConnectionString %>" SelectCommand="SELECT ProductID, ProductName, UnitPrice FROM Products">
        </asp:SqlDataSource>
        <asp:DetailsView ID="DetailsView" runat="server" DataSourceID="SqlDataSource1" AllowPaging="true" ForeColor="DarkGreen" BackColor="Snow" BorderColor="Tomato">
        </asp:DetailsView>
    </div>
    </form>
</body>
</html>